Navigation: How to Manage Customer Information > Change Names and Addresses Screens >
CIS > Change Names and Addresses
The Account Names and Mailing Labels screen displays a list of all accounts that are linked to an individual in the panel on the left side of the screen. Highlighting one of the accounts displays its vesting and mailing label information on the right side of the screen, including account information that identifies its type and description and ownership information that shows all of the names linked to the account and their relationship to the account (such as owner or beneficiary).
Individuals are displayed in the order that they were set up on the account and in the order that the original documents, such as signature cards, were printed. The current mailing label for the account is displayed below the list of names in the Mailing Label field group. To the right of the mailing label, a list is displayed of all the entities (accounts, retirement plans, etc.) that are linked to the mailing label. If a mailing label is changed on this screen, it will be changed for all the entities displayed in the list.
Note: This is the only Change Names and Addresses screen where you can reprint deposit account documents.
For specific scenarios on how to use the Change Names and Addresses screens to make changes, see the How-To Scenarios section.
You can change the name for the accounts you are viewing on this screen. To select a name, complete the following steps:
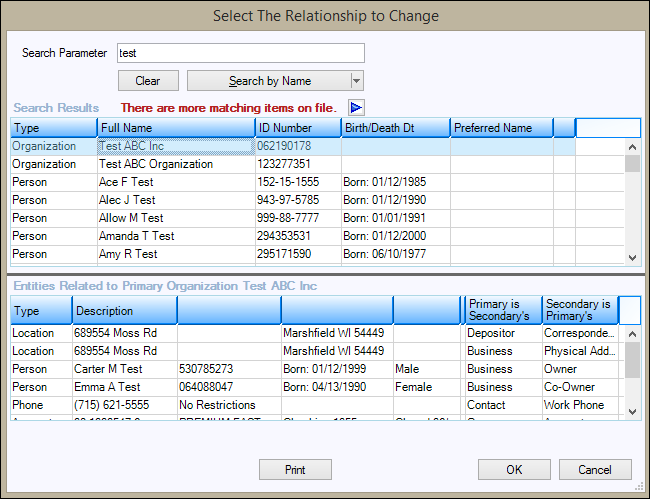
| 1. | Click the "Look up" link in the upper right corner of the Accounts List section. The Select the Relationship to Change dialog will open. See the following example. |

| 2. | In the Search Parameter field, type the information you want to find and then use the Search By drop-down button to specify the appropriate entity. You can search by any listed entity, and the default is to search by name. Click <Enter> to perform the search. Matches are displayed in the Search Results section below. |
| 3. | Clicking an entity causes all entities related to it to be displayed below. |
| 4. | To select a name, double-click on the person, organization, trust, or special text, or click on the selection and click <OK>. Click <Cancel> to return to the Account Names and Mailing Labels screen without selecting a valid entity. |
| 5. | The name will now display in the title of the Account Names and Mailing Labels screen and relationships for that name will be shown on the screen. |