|
Creating a Wire or Template |
  

|
Navigation: »No topics above this level«
Creating a Wire or Template
|
Creating a Wire or Template |
|
With the Fed’s implementation of the ISO 20022 format, we have added and deleted some fields on the Create and Edit Wire/Template screens.
To create a new wire or template:
1.Click on the Templates tab at the top of the Dashboard.
Note: The only difference between an outbound wire and a template is marking the Template checkbox. (See step 5 below.) Wires and templates go through the same submission and approval process.

2.Click the arrow next to Items per page and select the number of wires you want to view on one page. This number will stay at the last setting but can be changed as needed. You can use the right and left arrows (< >) to jump to the next or previous page.

3.Click  at the top of the screen.
4.In Step 1: Preliminary Information, select the Department*, Description*, Function*, and Local Instrument* fields from each drop-down list, then click <Next>.
5.To save this wire as a template, check the Template box and enter a Template ID (up to 64 characters alphanumeric). The ID must be unique for all templates and is used to identify the template for third-party use.
Tip: The most used transaction is Core Customer Transfer: CTRC (see the example below).

6.To create this wire with no fee, check the Waive Fee box. The wire list will show a ![]() to indicate the fee has been waived.
to indicate the fee has been waived.
7.Enter a Customer Memo if one is needed, then click <Next>.
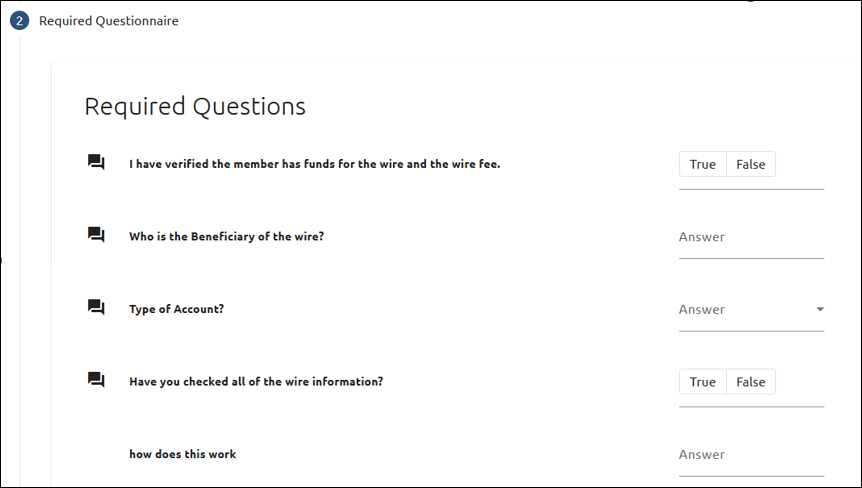
8.In Step 2: Required Questionnaire, answer the Required Questions that must be answered before entering the wire (if your department requires it).Then click <Next>.
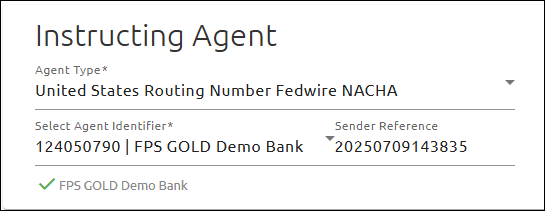
9.In Step 3: Creating Wire, all of the wire instructions are entered. In the Instructing Agent field group (previously Sender DI, the institution creating the wire request), select the Agent Type from the drop-down list (defaulted to “United States Routing Number Fedwire NACHA”).
10.Select the Agent Identifier (Instructing Agent’s ABA number(s)) from the drop-down list.
11.In the Instructed Agent field group (previously Receiver DI, the institution receiving the wire request across the Fedwire system), select the Agent Type from the drop-down list (defaulted to “United States Routing Number”).
12.Enter the Instructed Agent's ABA number in the Agent Number* field.

13.Enter the wire amount on the "Amount*" line.
14.Click on More Amount to display additional amount fields: Instructed Amount and Exchange Rate. These are useful for international wires.

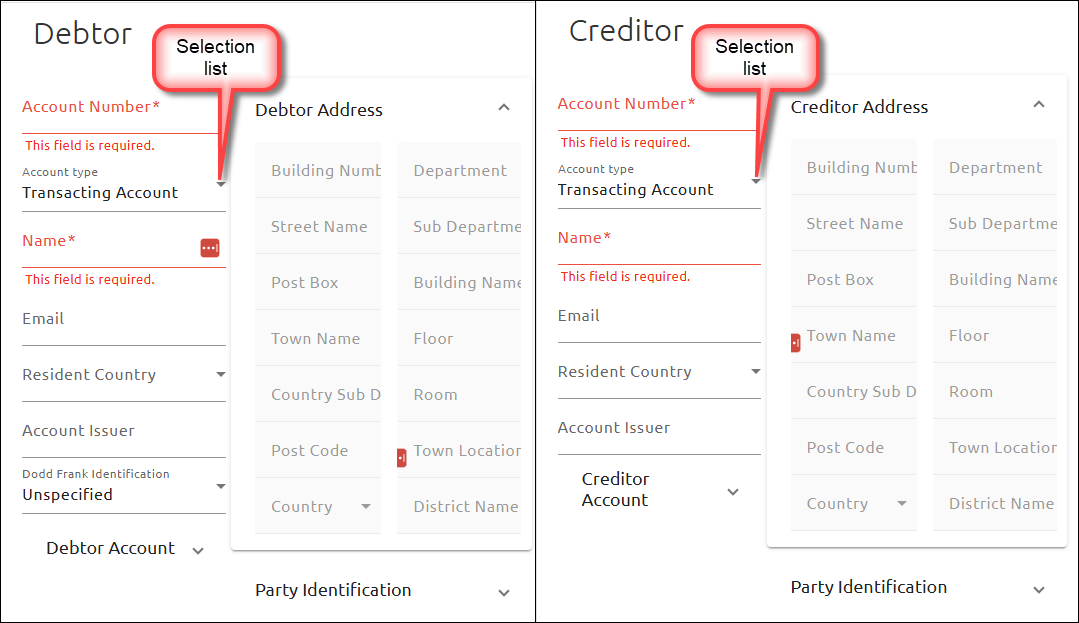
Debtor and Creditor Field Group
15.Enter the Account Number*.
16.Enter the Name*.
Debtor Agent and Creditor Agent Field Group
The Debtor Agent is almost always the same as the Instructing Agent, and the Creditor Agent is often the same as the Instructed Agent, so the values in Debtor Agent and the Creditor Agent field groups are auto-populated. Sometimes the Debtor bank is different from the Instructing Agent. If so, replace the name and values in the Debtor Agent field where the Debtor’s account resides.
Optional Fields
17.Enter or select information in any of the optional fields that apply:
•Select the Account type from the drop-down list in the Debtor and Creditor field groups. This field is not part of the FRB wire record. It is used in lieu of changing an account number in the wire record. The account number used for posting is pulled first from one of the following:
oInbound: Transaction Account, Intermediary Agent(s), Creditor Agent, then Creditor.
oOutbound: Transaction Account, Previous Instructing Agent(s), Debtor Agent, then Debtor.
•The Dodd Frank Identification field (previously Originator Classification field) is used to determine whether the Dodd Frank rules apply. When this field is set to “Personal,” the Dodd Frank rule is applied to the wire.
•The Previous Instructing Agent (1-3) field(s) (previously Instructing FI) is (are) used to enter one to three Financial Institutions that forwarded the wire instructions from the Debtor Agent to the Instructing Agent.
•The Intermediary Agent (1-3) field(s) (previously Intermediary FI) is (are) used to enter one to three Financial Institutions that will forward the wire instructions from the Instructed Agent to the Creditor Agent.
•Address fields have changed from Unstructured (three lines) to Structured (14 available fields). When a Town Name is entered, a Country is required. The other fields are optional.
•The FI to FI field has been replaced with the Unstructured Remittance Information field and is still optional.
•The Originator to Beneficiary field has been removed and the Unstructured Remittance Information field should be used instead. This field is still optional.
•The Instruction for Creditor Agent has two new fields (Instruction Type and Information). Instruction Type has a default of “None.”
•The Charges field group determines whether or not certain charges are borne by the debtor, creditor, are shared between the debtor and creditor, or borne by a service level. Up to three charges can be added to an outbound wire; there is an unlimited number of charges that can be added to an inbound wire.
•The Purpose field group allows a user to choose the purpose of the wire from the Purpose drop-down field. “None” is the default value.
•The Party Identification field allows you to choose whether the party is unspecified (“None”), a “Private” Party (e.g. Person), or an “Organisation”. “None” is the default.
•To display and use additional Debtor and Creditor fields, click the respective “More” button (see below).

18.Enter other information in the appropriate fields.
19. When you have finished entering all the information for the wire, click one of the following buttons:
•<Create Wire> - to create and save the wire.
•<Create Template> - to create the template (appears only when creating a new template).
•<Create and Submit Wire> - to create and submit the wire.
•<Cancel> - to clear the information and cancel the wire or template.