|
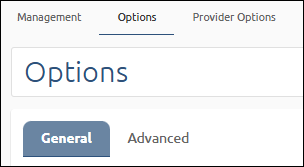
Options |
  

|
Navigation: Administrative Options >
Options
|
Options |
|
Use the Options screen to customize your wire options. The screen has two tabs: General and Advanced. This section explains the General Options.
Institution Info
When this information is entered in the fields, you can click a button on outgoing wires to get the information automatically populated.
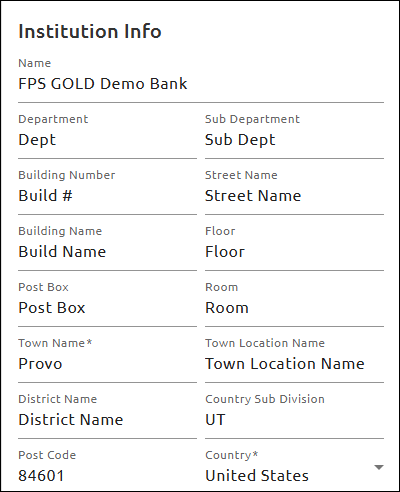
On the Debtor data for outgoing wires, click on the icon in the right corner to get the data populated with your institution information.

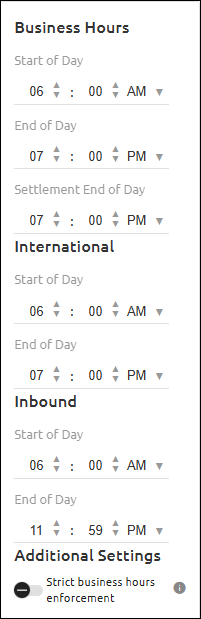
Business Hours
Use these fields to specify your business hours (local time). No wires will be processed outside the time period specified. When these fields are changed, the old data and new data are shown in UTC (Universal Time Code) time in System Logs.
•Start of Day: This is the start time your institution will allow the processing of wires (local time). Note: It should not be before the FRB start time, which is 9:00 p.m. Eastern time on the preceding calendar day.
•End of Day: This is the end time your institution will allow the processing of wires (local time). Note: It should not be after the FRB cutoff time, which is 7:00 p.m.
•Settlement End of Day: This is the end time your institution will allow the processing of Settlement wires (local time). Note: It should not be after the FRB cufoff time, which is 6:30 p.m. Eastern time. This time is also used for daily limits and FRB reconciliations. Totals will be reset at this time
•Strict business hours enforcement: When enabled, wires will be prevented from changing state outside of business hours, and inbound wires will be held in a processing state until the business day begins.
Holidays
Use these fields to set the dates of additional holidays not included in the FRB list of holidays. The FRB list of holidays is shown at the top of the dialog box. These are the days the Fed will not send wires.
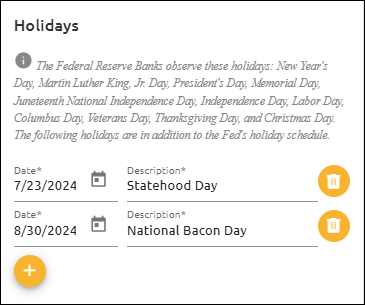
To add a holiday to your institution's calendar:
1.Click the ![]() button.
button.
2.Enter the new holiday in the Date and Description fields.
3.Click <Save Options> at the top or bottom of the screen.
G/L Transaction Accounts
Use these fields to enter valid General Ledger Transaction account numbers.
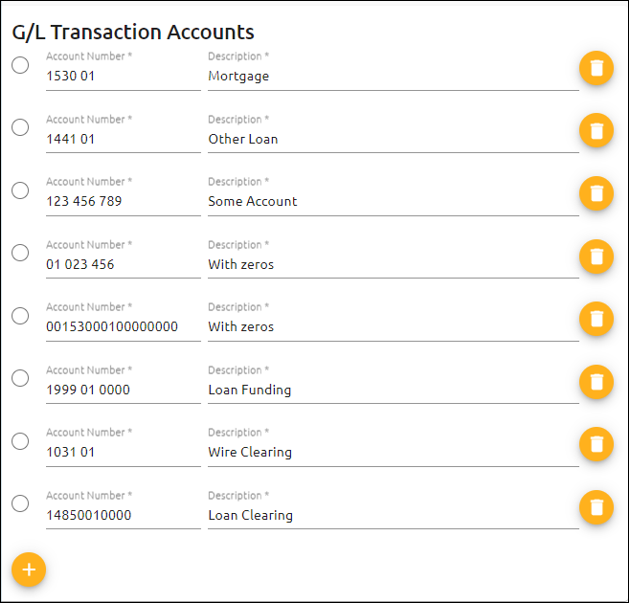
To enter G/L transaction account numbers:
1.Click the ![]() button.
button.
2.Enter a G/L transaction account in the Account Number and Description fields. The G/L Accounts entered here will be available to you when creating new wires. These G/L accounts can be used when wiring funds from a G/L account rather than a deposit account.
3.Click <Save Options> at the top or bottom of the screen.
G/L Offset Accounts
Use these fields to enter General Ledger Offset transaction account numbers and fees. The Domestic G/L Offset Account is required when using FPS GOLD as your core.

1.Enter your G/L offset transaction account number(s) for the Fed in the appropriate G/L Offset Accounts Transaction field(s) at the left. If you use Foreign wires, with or without exchanges, enter a G/L number in all the fields. If the Foreign fields are blank, we will use the Domestic G/L fields.
2.Enter your G/L offset fee(s) in the appropriate G/L Offset Accounts Fee field(s) at the right.
3.Click <Save Options> at the top or bottom of the screen.
NOTE
The full 17-digit General Ledger account number (with zeros) does not need to be entered in these fields. When entering G/L account numbers in this section, only enter the relevant General Ledger account sub-fields that have been defined in your General Ledger Company Options with one space between each field. For example, if your institution has a four-digit G/L account number and a two-digit branch, the G/L account number would be entered this way: 1000 01. |
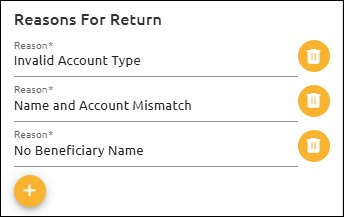
Reasons for Return
Use these fields to customize return reasons to be used in EFT GOLD. Using this feature allows your users to select an institution-approved reason, rather than having users enter various reasons.
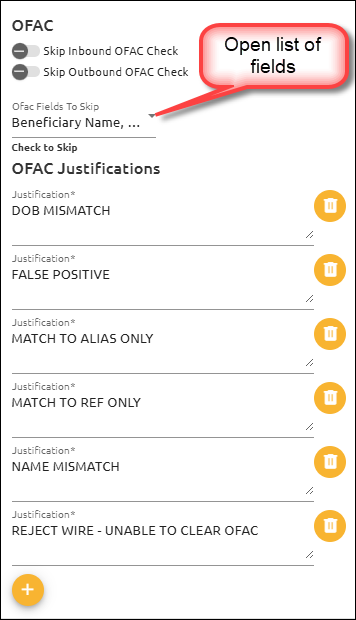
OFAC Options
Use these fields to add skip fields for OFAC checks and to add institution-approved reasons for skipping an OFAC hit. See the table below the example for information on how to use the fields.
Field |
How to Use It |
Skip Inbound OFAC Check or Skip Outbound OFAC Check |
These fields allow you to skip checking all inbound and/or all outbound wires for OFAC names. Click on either or both fields to select them. |
Ofac Fields To Skip |
1.Click on the arrow to open a selection list of other fields you can skip for OFAC checks. 2.Check all fields you want to skip. |
OFAC Justifications |
Add custom reasons that will be shown when users click in the Reason field while handling an OFAC Hit on a wire. Using this feature allows your users to select an institution-approved justification, rather than having users enter various justifications.
•Type a reason on the text line. •Click the Plus icon •Click the Trash icon |
OFAC Lists
The Office of Foreign Asset Controls and other government agencies create a number of lists for which banks should not do business.
The OFAC lists include the following:
•Specially Designated Nationals (SDN), published by OFAC. Persons in this list are blocked from doing financial transactions in the US.
•Foreign Sanctions Evaders (FSE), published in the consolidated sanctions list by the US Treasury - OFAC. Persons in this list are blocked from doing financial transactions in the US.
•Sectoral Sanctions Identifications (SSI), in consolidated list. Directives in the individual entries describe the prohibitions on dealing with the names in this list.
•Palestinian Legislative Council (NS-PLC), in consolidated list. Persons in this list are blocked from doing financial transactions in the US.
•List of Foreign Financial Institutions Subject to Part 561 (Part 561), in consolidated list. Persons on this list cannot be subject to sanctions after Oct 18, 2015. Banks will need to refer to the US Treasury website for specific sanction waivers.
•Non-SDN Iranian Sanctions Act (NS-ISA), in consolidated list. Banks will need to refer to the US Treasury website for specific sanction waivers.
How We Match
FPS GOLD automatically checks every two hours from 6:00 a.m. to 4:00 p.m. daily to see if there are new files. If we find a more current list, we download the file to our OFAC server to be used in the OFAC check process.
The OFAC SDN list and the OFAC consolidated list are matched against customer names using the same criteria. Older OFAC matching schemes used by FPS GOLD as well as the OFAC internet pages were analyzed to come up with this adjusted matching version. In analyzing matching schemes, the scheme described here and employed by this system seems to provide the fewest false positives while catching names with slight spelling variations that can be misspellings of one of the sanctioned names.
For each name, both the customer name and the sanctioned name are converted to a Soundex representation. The following steps explain how Soundex works on this sample text:
"Ben Franklin was born on January 17, 1706."
1.The name or phrase we want to use Soundex for is converted to uppercase letters, and all special characters and numbers are removed. The result looks like the following example:
BEN FRANKLIN WAS BORN ON JANUARY
2.The first letter of each word is kept, and A, E, I, O, U, W, and Y are excluded:
BN FRNKLN WS BRN ON JNR
3.Each word is converted to a six-letter Soundex code by keeping the first letter and replacing the remaining letters with numeric values until the code is six digits long or until the end of the word is reached. The replacement digit is not added if it is the same as the previous digit. If the end of the word is reached and the code isn’t six digits long, enough zeros are added to the end to make it six digits.
4.The letters are replaced according to the list below:
oB, F, P, and V are replaced by a "1."
oC, G, J, K, Q, S, X, and Z are replaced by a "2."
oD and T are replaced by a "3."
oL is replaced by a "4."
oM and N are replaced by a "5."
oR is replaced by a "6."
The result for the example text above is as follows:
B50000 F65245 W20000 B65000 O50000 J56000
When the matching process takes place, the following steps are used to evaluate the match:
1.For each six-letter Soundex code in the phrase, we look up any words on the sanctioned list that contain the same code.
2.We look at each code within the sanctioned item and compare how many of the sanctioned codes are within a certain number of words in the original phrase, to the current position in the phrase. By matching words within a certain proximity, we can avoid matching a word found at the beginning of a customer name with a word at the end of sanctioned name. For most names the entire name is matched, but the proximity matching helps to have fewer false positives for names containing several words. If a word in the phrase has already been matched, it will not be matched again when we process the next customer name word. Several customer names and sanctioned names have the same word twice in the name or similar words that map to the same Soundex code. The process ensures that we treat each occurrence of a word uniquely and do not match one word in the customer name to two words in the sanctioned name or vice versa.
3.Once the matches have been determined we determine the confidence of the match as follows:
a)If there is only one word in the sanctioned name, the customer name must also have only one word, and they must have an exact spelling match.
b)When there is more than one word in the sanctioned name, the name is considered to be a suspect, as shown in the table below.
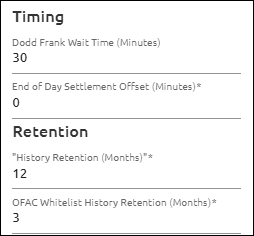
Timing
Use this dialog box to enter Dodd Frank wait time (Timing), End of Day Settlement Offset (Offset), and retention periods (Retention) for wire history and OFAC Whitelist History (OFAC Retention).
•Timing: The time entered in this field determines how long wires will be held. Enter the value in minutes.
•Offset: Enter the number of minutes for the End of Day Settlement Offset. The default is 0.
•Retention: Enter the number of months you want to store wire history for all records.
•OFAC Retention. Enter the number of months you want to keep whitelisted names on file.
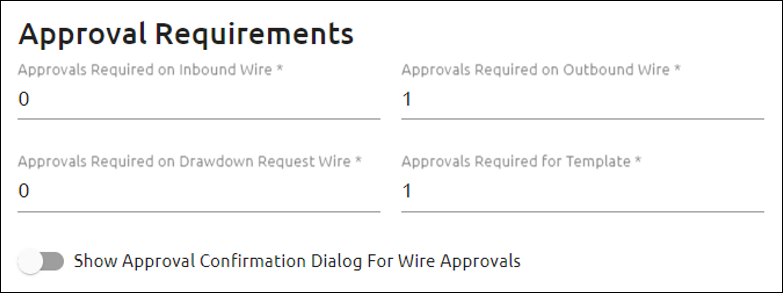
Approval Requirements
For multiple approvals for wire processing, enter the number of approvals required for each inbound and outbound wire.
If you would like to have a confirmation dialog box pop up when wires are approved, click Show Approval Confirmation Dialog For Wire Approvals. This will prompt a dialog box to pop up which will say, “You are about to approve wire(s) 12345, press OK to confirm.” If approving multiple wires, all wire numbers selected for approval will be listed. If this option is on, the approval dialog box will pop up every time wires are approved. If an unintended wire is selected for approval, you can click <Cancel>, and the wire status will not change.
Limits
When the Daily Limit Method is set to "Max Value,” the highest Daily Max Limit found for the user will display. When the Daily Limit Method option is set to "Sum," the sum of all the Daily Max Limits found for the user will display.
When Ignore Limits for Inbound Approvals is set, inbound wire approvals can be granted regardless of limits.

Departments/Countries
Use this dialog box to specify the following:
•The default department that will be defined throughout the system.
•The countries that will be restricted from appearing in the International Countries drop-down list when creating an outbound wire.

Use this dialog box to turn two-factor authentication on or off. To use this feature, you will need to use Google Authenticator or another app that uses the same algorithm to obtain a soft token. On Save, you will immediately be required to enroll.
Turning this feature off will remove all enrollments, and all users will be required to re-enroll if the option is turned back on.

User First Logon Delay Field
When a number is entered in this field, that number of hours will need to elapse after any user first attempts to log in before they can access the system. Then the user will be presented with an error stating that they have a waiting period. After the waiting period, the user can access the system.
If the waiting period is set to zero hours, the new user will be allowed to log in immediately.
Use these fields to allow or disallow updates on templates. When these fields are allowed, users will have the corresponding data fields open for creating a new wire from a template.
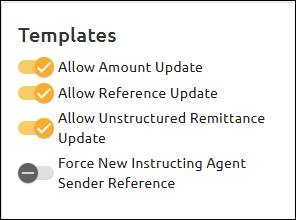
When Force New Instructing Agent Sender Reference is used, the system will check the reference data in the Instructing Agent Sender Reference field against the data in the original template. If data is not entered in the reference number field or is the same as the original template, a new reference number will be created based on the current UTC date and time in this format: YYYYMMDDHHMMSS. If the data is different, we will use the new data.
FRB
Use this dialog box to set the minimum FRB balance that will trigger an alert for your company. The balance is checked approximately every 30 minutes, or with each monetary wire. All wires will be placed in a “Needs Review” state if the wire amount will put your Fed account below this level. Wires can be approved with overrides when needed.

Field |
How to Use It |
Receive FRB General Broadcast Messages |
Select this option if you want to view the FRB Broadcast Messages, including the Subsidiary Statement used for balancing. These messages are displayed under the Menu > FRB Messages screen. If this option is turned off, EFT GOLD will not display these messages. (You must be assigned to the “WireMessageReaderGroup” Active Directory profile or System Profile in CIM GOLD if you are on the FPS GOLD Core.) |
Do Not Transmit to the FRB |
Select this option if you want to enter wires in EFT GOLD to track the wires, but send the wires another way, such as online through FedLine. If this option is turned off, the wires will be sent to the FRB. |
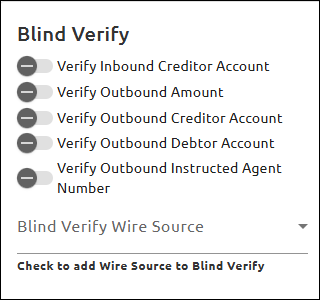
Blind Verify
Use this dialog box to select fields that need to be verified before the wire can be approved.
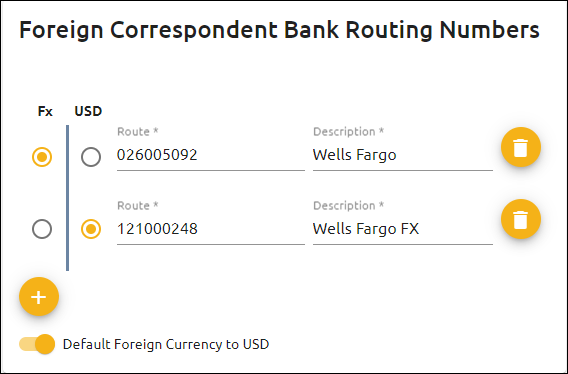
Use the fields shown below to enter the Foreign Wire Provider(s) you use and the Foreign Correspondent Bank Routing Numbers. If you use multiple Foreign Correspondent Banks, you can designate a Foreign Correspondent Bank routing number for USD and/or for Foreign Currencies (Fx). Only one routing number can be designated for USD. However, it can be the same as or different from the Foreign Currencies (Fx) routing number.
When Default Foreign Currency to USD is enabled, it sets the default currency for every country selected to "USD." When Automatically Mark Incoming Wires International is enabled, it sets the default currency for every country selected to "Fx."
You can also select an option for defaulting the Charge Bearer field when sending international USD wires and international Fx (Foreign Currency) wires. The available selections for these options are Creditor, Debtor, Shared, and Service Level.
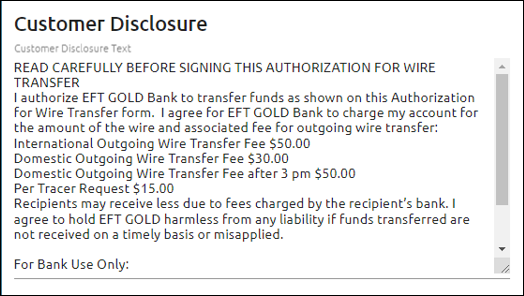
Customer Disclosure
Use this dialog box to enter the wire origination disclosure text that will print on your Legal Acceptance Document. This information prints on the Legal Acceptance document on outbound wires.
To print the Legal Acceptance Document:
1.Select a wire.
2.Click <Print View> to open a list of print options.
3.Select "Legal Acceptance Document."
4.Click <Print> on the dialog box that opens.
Dodd Frank Verbal Disclosure
This dialog box is used to enter the text that will be included on the Dodd Frank Verbal Disclosure for international wires.
Replacement tags for common fields required on the disclosure are also included to avoid manual entry for these fields every time an international wire is created.

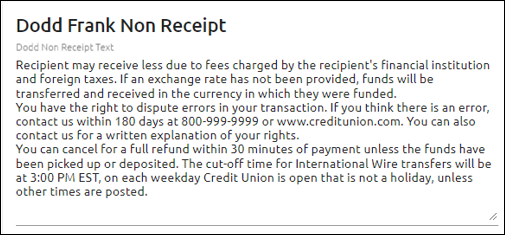
Dodd Frank Non Receipt
This dialog box is used to enter the text that will be included on the Dodd Frank Non Receipt disclosure for international wires.
Institution Routing Number
Use this dialog box to enter the routing number(s) you will use to originate wires.

Fees
Use this dialog box to enter wire fee amounts. If the fields are blank, no fees will be assessed.
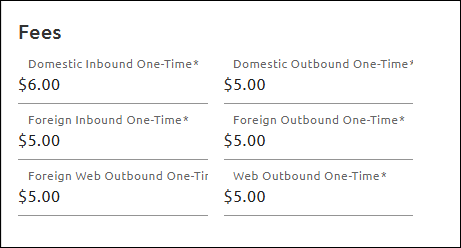
If you use Commercial Account Analysis and do not want these fees assessed, select Skip Fees For Account Analysis on the Provider Options screen.
Inbound and Outbound Verification
For FPS GOLD clients, the Creditor Account Name is automatically verified when posting inbound wires. If the Creditor Account Name on the wire doesn't match any of the names on the account, the wire will be stopped.
If you don't want this verification, click Skip Verify Creditor Account Name. Additionally, if you don’t want this verification for BTRS (Bank Transfer with the bank as the creditor) wires, click Skip Verify Creditor Account Name for BTRS.
For both inbound and outbound wires, you can enter a number of calendar days back to check for duplicate wires (0 = do not check; 1 = check today; 2 = today and yesterday, etc.) If the wire direction, Creditor, Amount, Creditor Account Type, and Creditor Account Number match within the specified number of days, it is considered a duplicate.
We check the following when determining if a potential duplicate wire exists:
•Ensure it is not a template.
•The wire has not been canceled.
•It does not have the same wire number.
•The Instructed Agent ABA/Agent Number, Amount, Creditor Account Type and Account Number are the same.
•The action date/time happened within the specified number of days.
When Wire Upload Verification is set, an uploaded wire will be placed in a "Needs Review" state if the name on the account cannot be reconciled against the core’s database.
When Allow Copying A Wire is set, the Copy A Wire functionality can be used. This field is defaulted to off. When it’s off, the
<Copy A Wire> button will be disabled for all users.

Account Masks
You can create or edit Account Masks on the Admin Options screen.
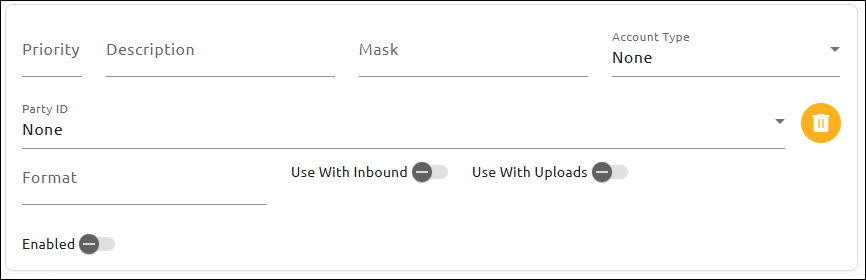
To create a new Account Mask:
1.Click the Plus icon ![]() at the bottom of the Account Masks field group.
at the bottom of the Account Masks field group.
2.In the Priority field, enter a number to determine the order for the mask process.
There can only be one Mask for each priority. When the mask process is being run, it will start with the highest priority (lowest number) and move its way down. If two Account Masks apply to one wire, the higher priority item will take effect, and the other will be ignored.
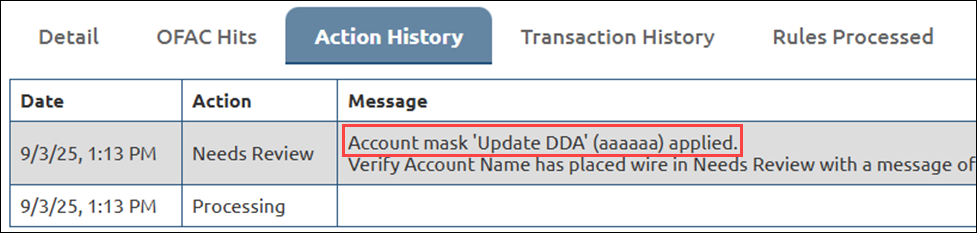
3.In the Description field, enter a brief description to make it easy to identify the Mask in the Action History.
This description will appear on the Action History tab when a Mask takes effect.
4.In the Mask field, enter either the Debtor Account or Creditor Account on the wire.
You can enter a literal account number into this field, or you can enter a placeholder (typically using a letter) if the formatting is more important than the account number itself. See "Using Account Masks" below for more information.
5.In the Account Type field, select an option from the drop-down list.
When the mask is applied, it will use the Account Type entered as the Transaction Account Type on the wire. If "None" is selected, the Transaction Account Type will default to the type that was used on the wire itself.
6.In the Party ID field, select "None," "Private," or "Organization" to automatically update the Party Identification for the participant.
7.In the Format field, you can enter a format that the Transaction Account should use. This field is optional.
The Format of the Mask can change how the Transaction Account is ordered or add a prefix or suffix to the account. If no Format is entered, the Transaction Account will have the same formatting as the Account Number. See "Using Account Masks" below for more information.
8.If you want to tell the mask to run on inbound wires, click on the Use With Inbound selection button ![]() .
.
9.If you want to tell the mask to run on uploaded wires, click on the Use With Uploads selection button ![]() .
.
10.Use the Enabled option to completely turn the mask on or off.
Using Account Masks
The following example explains how to use Account Masks.
Let’s say your default account structure is “01” followed by a 6-digit account number, but occasionally the wires you receive do not contain the prefix of the account. Your mask could be set up as “aaaaaa,” indicating that you are looking for 6 digits in the Creditor Account field. Your format might then be set up as “01 a.” This tells the system to bring through the “a” (6-digit account number) and add a “01” to the front of it. In this example, if the Creditor Account was 123456, the Transaction Account would then be 01 123456.
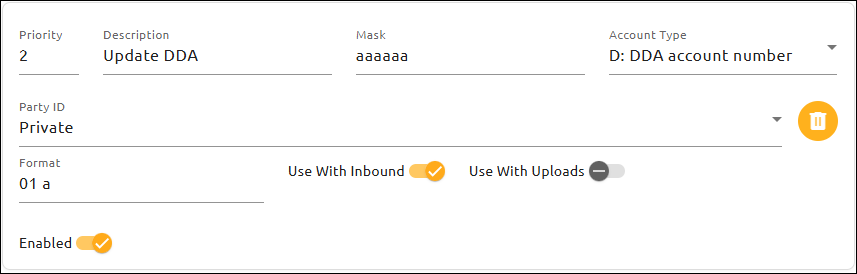
Once a mask is applied, the Action History will be updated, showing which mask was used.
Questionnaire for Wire Origination
You can set specific questions for customers to answer when a wire is originated. The answers to these questions are attached to the wire to assist with research and auditing.
To set up these questions, use the fields found under Admin > Options > Required Questions. You can create three types of questions: multiple choice, fill in the blank, or true/false. If you select multiple choice, a field will open where you can enter each multiple choice separated by semicolons (“;”).
The questions can be placed in a certain order using the arrows to the left and marked as “Internal,” meaning the question must be answered by the bank employee and not the customer.

When a wire is saved (either created or submitted), the text of the questions and associated answers are saved with the wire and are displayed on the expanded wire view on the dashboard on a tab labeled “Questionnaire.”
In addition to displaying on the dashboard, the text of the questions and associated answers will be displayed in the “Questionnaire” section in the Activity Details report below the Action History section, as shown below.
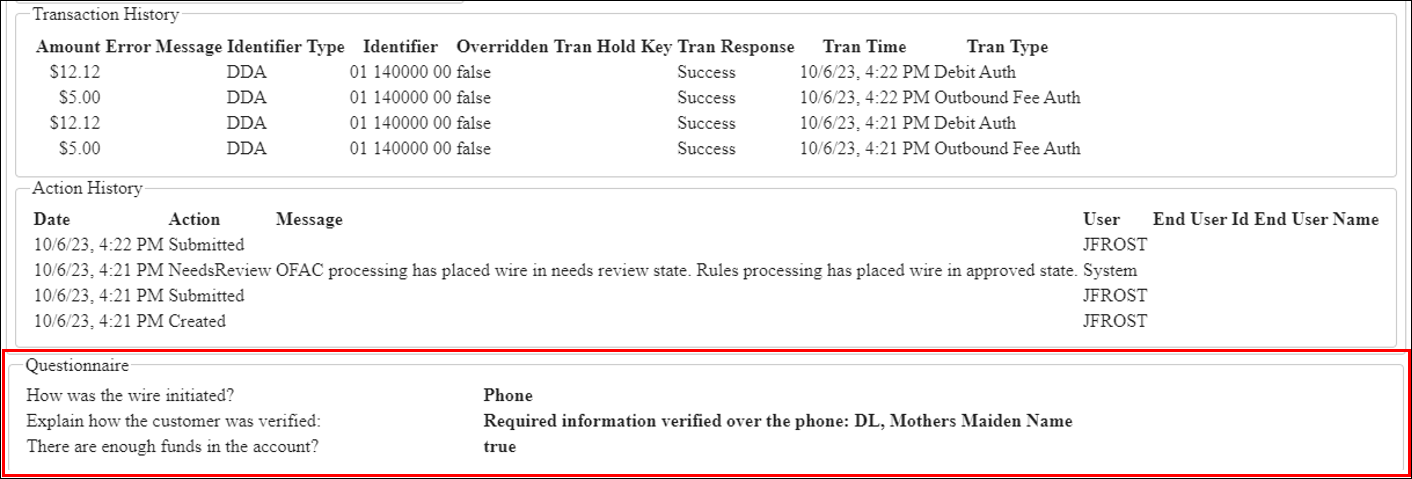
The text of these questions and associated answers is also included in the Agreement Document after the Wire General Information and only shows questions not marked as “Internal.”

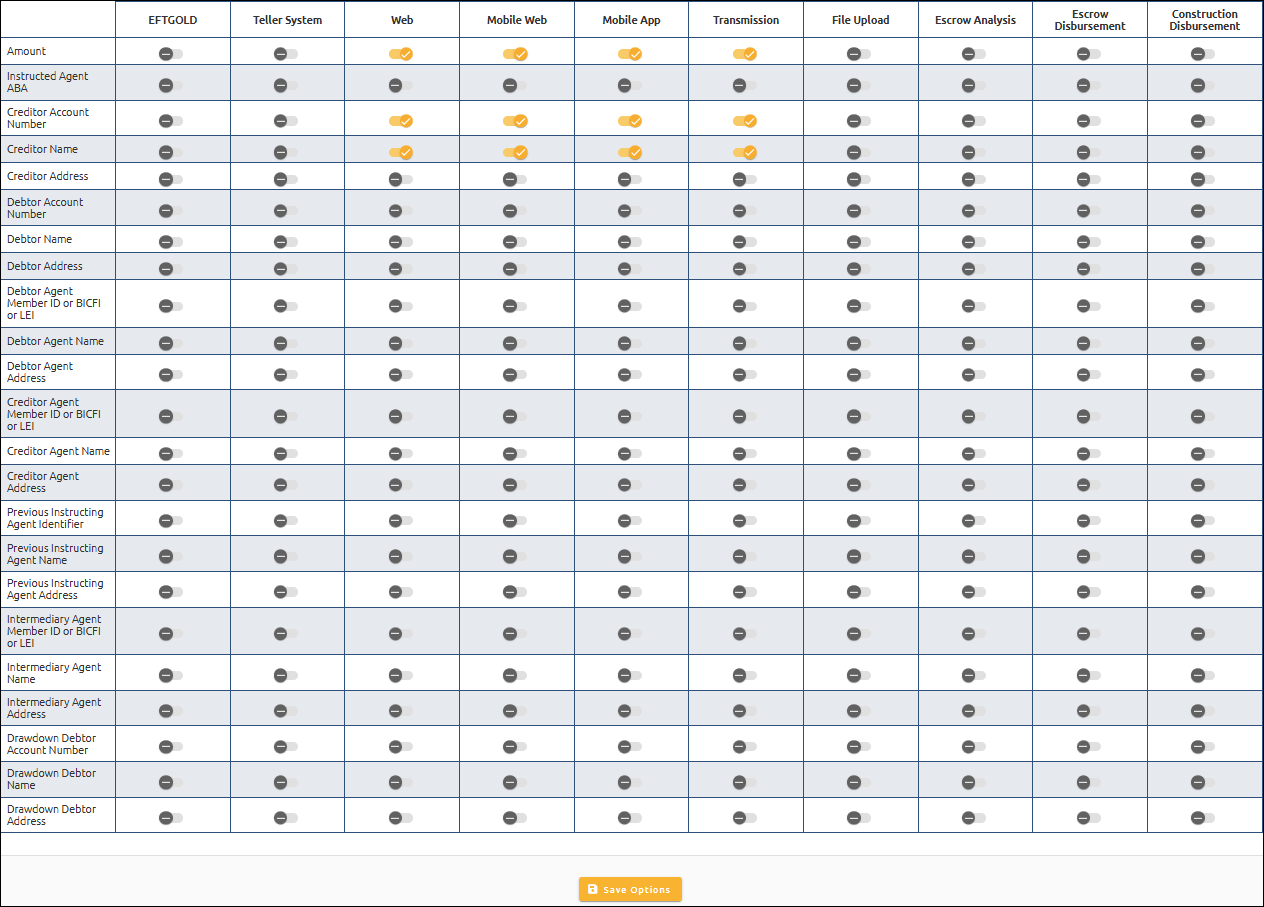
You can restrict fields from ever being modified based on the source of the wire. The list of fields and sources is shown below.