Navigation: Notification of Change >
Notification of Change list view
Entry: System, list view
F/M: No
Mnemonic: N/A
The list view on the Notification of Change screen displays all Notification of Changes that have been set up for your institution in the last two years. This information is originally entered on the Notification of Change Details dialog box.

To filter the list on the screen:
•Click the Skip If Sent To Fed box to display only notifications that have not been sent to the Federal Reserve from the past two years.
•Click Skip If Older Than Today to display only NOC records for the current day.
•To make any changes to these notifications:
• Double-click on an item in the list. or
• Single-click and then click <Edit> at the bottom of the screen.
The Notification of Change Details dialog box will be displayed, where you can make changes to the fields under Corrected ACH Information. You cannot make any changes to any notifications that have already been sent to the Federal Reserve Bank. The Sent? column will display a "Y" if the notification has already been sent.
Notification of Change (NOC) records will be kept on the system for two years, or until you select a notification in the list view and click <Delete>.
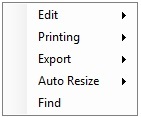
Additionally, if you right-click on this list view, the following pop-up menu is shown:

The following table explains each of these pop-up functions:
Pop-Up Function |
Description |
|---|---|
Edit |
Selecting this option allows you to copy the highlighted information in the list view to your Windows® clipboard. To highlight more than one record in the list view, choose Edit, then Select All. After you have copied the highlighted information from the list view using the Edit pop-up function, you can then paste that information into Notepad or any other word processing program.
Note: The formatting will look better if you use the Export function instead. |
Printing |
Select this option to print the information in the list view to a designated printer. You can preview the information before printing it and make any needed adjustments to the printer settings or page setup. |
Export |
Select this option if you would like to export the information in the list view to either a tab-delimited format or to FPS GOLD's Report Manager program. If you export to a tab-delimited format, you can open the information into a spreadsheet program such as Microsoft® Excel®. |
Auto Resize |
This function is used to resize the columns and rows in the grid to fit the data contained therein. |
Find |
The Find function allows you to search for any word, phrase, or amount in the list view. This is a helpful tool to find the exact information you are looking for.
When you select this option, the Find dialog displays. Enter the information in the top field and click <Find>. All matching information will be displayed in the list view below the search field. Double-click any of the results and you will be returned to the list view with the item you selected highlighted. |