Counter Check Form Design |
  

|
Navigation: Setup > Administrator Options > Counter Checks >
Counter Check Form Design |
|
Before your institution can begin to print counter checks, you must set up check formats. FPS GOLD has assigned format 6 for counter checks. Sub-formats can be used if different check formats need to be printed, such as personal or business checks where the check numbers are leading or following the routing and account numbers. Your institution then uses the formats to specify where and what data is printed on a check.
An “industry standard” MICR font should be purchased and saved in the fonts folder on the PC of each user who will be printing MICR checks. All users at the institution must use the same font.
In addition to the font, you must have the blank check stock needed for each type of check you want to use, and you must have a check printer available for tellers using CIM GOLDTeller.
After you have the font, check stock, and printer available, use the Counter Check Form Design screen (shown below) to set up your check formats.
To design counter checks:
1.Click <New Format> to design a check from scratch.
2.Or click <Copy Format> if you want to copy an already-saved format, make changes to it, and save it with a new format number.
3.Use the information after the screen example below to complete the check setup.
4.Click <OK> to save changes or <Cancel> to close the screen without changes.

CIM GOLDTeller > Functions > Administrator Options > Counter Check Form Designer
This screen contains the following buttons and fields.
Button or Field |
How to Use It |
|---|---|
<New Format> |
To create a new format, click this button and then enter a format number between 0001 and 9999 in the Format field. |
<Save Format> |
Click this button to save the new format. It is added to the Select a Check Format list view. |
<Copy Format> |
Click this button to quickly copy and modify a format that has already been created. See "Modifying a Check Format" below for more information. |
<Delete Format> |
To delete a format, select the format from the Select a Check Format list view, then click this button. A dialog box box opens for verification. Click <Yes> to delete the format. |
<Save Format> |
After creating a new format, copying a format, or modifying a format, click this button to save it. |
Don't Show on Select Form |
Mark this field if the selected Counter Check Form should not be shown as an available form for printing on the Counter Check Writer screen Select Form list. |
<Print Preview> |
Click this button to view how data will actually appear on a check. This is helpful, for example, to see if the size of data would overlap other data, to see where asterisks display, and how an account number would be displayed. |
<Print Test> |
Click this button to print a test check. The purpose for printing a test check is to be sure the printer is set up correctly and that the check format is printing everything in the correct places. The Print Test is the most accurate view of how a check format will be printed. |
<Create MICR> |
If you print on blank check paper, you must print the Magnetic Ink Character Recognition (MICR) data on your checks. Selecting a format and clicking this button opens the Create MICR Line dialog box. See Create MICR Line for Counter Checks for more information. |
Format Settings field group These fields are used to set up basic information pertaining to individual formats. Each format can have unique settings so that different-size checks can be used. |
|
Format |
FPS GOLD has assigned format 6 for counter check printing. Sub-formats can be used if different checks are created for the various types available. The institution then uses the formats to specify where and what data is printed on a check. |
Description |
This field is used to enter a brief description for the type of check you are setting up. For example, you could enter "Personal CK 4-Up Format" or "Business Ck 3-Up Format." This description appears on the Counter Check Writer screen to indicate what type of check is to be printed. |
Width (Inches) Height (Inches) |
The Width and Height fields are used to enter the size of the check paper you are printing on, using decimals when necessary. For example, enter "8.5" for the width and "11" for the height. |
Image Path |
When you want to scan an image or check to be used as an overlay, a logo, or signature and save it to a file, this field allows you to locate the scanned file and import it to the format. Click the browse button to the right
Scanning checks lets you see an image of the actual check for field and logo placement. Scanned logos and signatures actually print on a check, so you can use blank check paper. The system can open the following file types: BMP, JPG, GIF, TIFF, and PNG. The scanned check can be used to design your new one.
For checks, this feature is helpful when you are determining where data should be placed on the format. The system does not print the scanned check; it just displays it on the grid so you can see where to place the data fields. |
Available Print Fields To place a field on the check, drag and drop the field from this section to the check format grid. You can use any or all fields and can use them multiple times on the same check. TIP: Use the <Shift> or <Ctrl> keys to select multiple fields and drag them all at one time. Use the arrow keys on your keyboard to move the fields on the grid.
As you are placing data on the check, be sure to allow for margins, logo, signature lines, and MICR line. |
|
CWAcct |
This is the account number the check is being printed for. The account number does not need to be placed on the check, but you may want to use it on a stub for your customer’s information. |
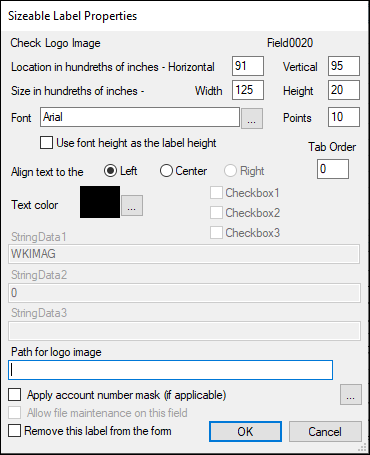
WKIMAG Check Logo Image |
Placement and size of this field allows for a logo image to be placed on the check. You must right click on this field to select the Path for the logo image that is placed in a folder all users printing the check format can reach on your network. |
Check Number |
This is the number that is printed on the check and can be up to six digits long. This number is based on what is entered as the starting number when checks are printed. As each check is printed, the system increments the check number by one. |
CKWOwner Owner 1–4 |
These are the fields associated with the name and address information taken from the account that is entered when checks are printed. Owner Lines 1–3 are required on the form or an error will generate when the check is printed. Owner line 4 is optional. |
You can quickly copy and modify a format that has already been created.
To copy a format:
1.Click <Copy Format> on the Counter Check Form Design dialog box. The Copy or Import Check Format dialog box opens.
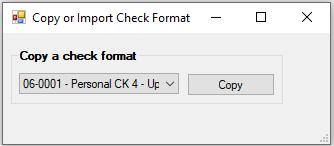
2.Select the number of the format you want to copy, then click <Copy>. This immediately copies the format and displays the data.
3.Enter the new format number into the Format field of the Check Format Setup screen. The words "(copy of)" and the name of the format you copied are displayed in the Description field.
4.Clear and change the description for the new format.
5.Make any other modifications, such as which fields to display on the check, and click <Save Format>.
You can change the size, font, alignment, and color of the text in the fields. You can also delete fields from the format.
To change text properties:
1.Right-click on fields placed in the grid to open the Sizeable Label Properties dialog box (see the example below).
2.Use the fields on the dialog box to change text properties.
3.Click <OK> to save your changes and close the dialog box.
To remove a field from the check design:
1.Mark the Remove This Label from the Form field.
OR
2.Click on the field and press the <Delete> key.