Upload and Link Files Screen |
  

|
Navigation: GOLDVault User Guide >
Upload and Link Files Screen |
|
The Upload and Link Files screen is used to add new document files and their associated links to the database. The following is an example of this screen.
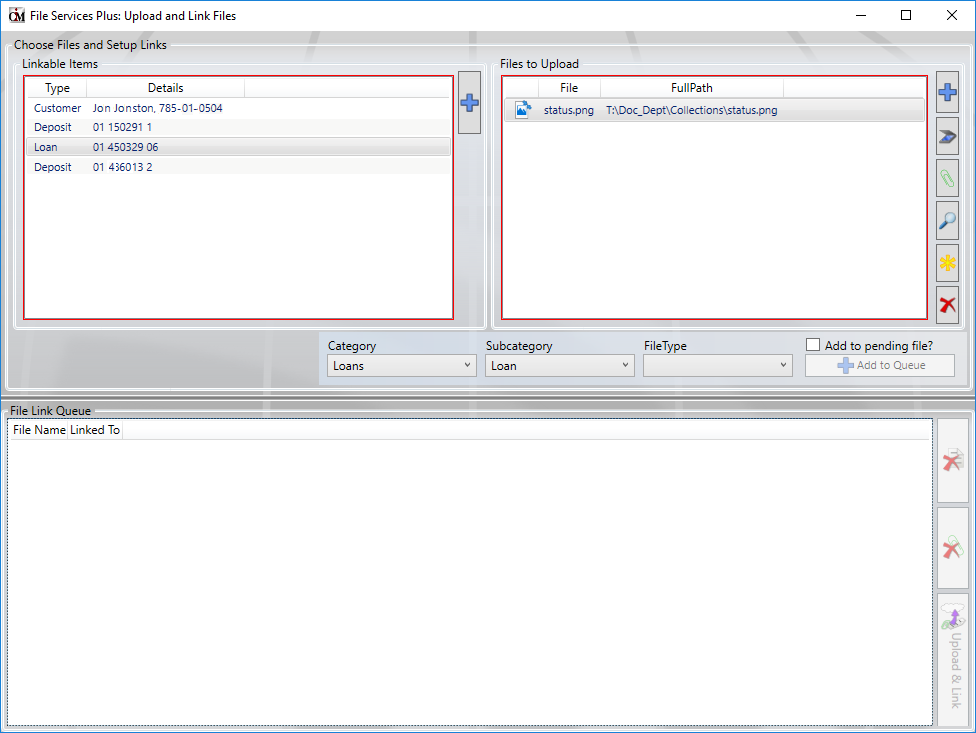
The screen is made up of three sections. The box in the upper left portion of the screen displays items, such as accounts and names that can be linked to files. The box in the upper right portion of the screen displays files that can be added to the database. The buttons in the center of the screen are used to define what kind of file (category, subcategory, and file type) is being added to the database, and the bottom section shows files with assigned links that are ready to be added to the database.
The screen functions by selecting one or more of the linkable items, one or more of the files to upload, and a specific category, subcategory, and file type. The files to upload can be either files that are already on disk somewhere or are scanned in during the upload process. Clicking the <Add to Queue> button combines all combinations of the selected links, files, and classification fields and displays them in the File Link Queue. Continue the process until all desired combinations are displayed in the File Link Queue. If mistakes appear in the queue, you can remove links from a file, or you can remove the entire file and all its links from the queue. When the queue is complete, click the <Upload and Link> button to save all files and associated links in the database.
Files added from this screen always go to the General Approval Queue. You may want to add a document from this screen as a pending document so you can have someone review the image file before it is made available for normal use.
Feature |
Definition |
Linkable Items |
Linkable items are links that you are working with that were passed to this screen from its calling application. With proper role security, you can use the Plus button to add additional links to the linkable items list. |
Files to Upload |
This list contains files that you can choose to upload to the GOLDVault database. This list may contain files that were passed to this screen from its calling application. You manipulate files in this list with the buttons to the right of the list as follows:
•Browse for files to upload. Click this button to browse your computer or network to find the file or files you want to upload. When you select them here, they will be added to the file list. •Scan files to upload. Click this button to begin the scanning process to scan files to upload. When the scan process is complete, the scanned files will be added to the file list with a generic file name. •Get file from Clipboard. Click this button to retrieve a file from the Clipboard. •View selected files. Click this button to view the highlighted files. If you have more than one file highlighted, you can navigate amongst them using the buttons at the bottom of the File Viewer dialog. •Rename selected files. Click this button to rename a file or files in the list. In the pop-up box, type the main file name that you want the file to be named when it is stored in the database. You cannot change the file extension. Renaming a file using this option will not change the current file name. It will only change the name of the file that is stored in the database. Original files that you browsed or scanned will not be altered in any way. If you rename multiple files, each file will have the same name with a number appended to the end. For example, if you highlight three different files and use this rename selected files to name them MyStuff, they will be named MyStuff0001, MyStuff0002, and MyStuff0003 in the GOLDVault database. •Remove selected files from the list. Click this button to remove the highlighted files from the Files to Upload list. |
Classification selection |
Select a category, subcategory, and file type for the files you want to upload. |
Add to pending file? |
Check the Add to pending file? checkbox to add files in a pending status. |
Add to Queue |
Click this button to add all combinations of highlighted linkable items and files to upload with the selected classification fields to the File Link Queue. You do not need to worry about duplicating data when you click <Add to Queue> multiple times. The screen will not allow duplication and will automatically remove duplicates when you repeat a file name, a link, or a classification. |
File Link Queue |
The File Link Queue displays the files and links that are ready to be added to the database. You can make changes to the queue by removing erroneous links and/or files and adding them correctly using the Add to Queue procedure listed above. When the queue displays the data you want to upload, click the <Upload & Link> button. You can manipulate files and links in this list with the buttons to the right of the list as follows:
•Remove file and all its links from the queue. Clicking this button will remove all highlighted files and their associated links from the File Link Queue. •Remove selected link(s) from file. Clicking this button will remove all highlighted links from their associated files in the File Link Queue. If all links are removed from a file, the file is also removed. •<Upload & Link>. Clicking this button uploads the files and their associated links to the database. When the work is completed, this function will display what took place so that you can verify the work. |
|
Next topic: Attach Files Screen |
|
Previous topic: View Attached Files Screen |