View Attached Files Screen |
  

|
Navigation: GOLDVault User Guide >
View Attached Files Screen |
|
The View Attached Files screen is the main GOLDVault control screen. It is used to look up files in the system and to perform specific actions on those files. The following is an example of this screen.

The top portion of the screen is used to enter search criteria. The buttons in the upper right-hand corner allow you to set certain options. The bottom portion of the screen gives a list of files that match the search criteria. Double-clicking a file in the list will display the file. Selecting a file or collection of files in the list and then clicking on one of the icons in the toolbar at the top of the file list or right-clicking and selecting options from the pop-up menu allows you to perform other actions on the files, such as exporting, printing, deleting, or updating.
Field/Button |
Definition |
Linked To drop-down |
This drop-down list allows you to select which index type to look up. In the example above, the Customer lookup is selected. Valid index types are as follows:
•Loan. A loan account number, including office, number, and check digit. •Deposit. A deposit account number, including office, number, and check digit. •Customer. A customer can be searched by either name or customer number. To look up by name, enter the name in the Name field and leave the Customer Number field all zeros. To look up by customer number, enter the customer number. If a customer number is entered, GOLDVault will search by the customer number, regardless of what is entered in the Name field. Use the SSN, EIN, or IDN radio buttons to specify whether the number is a Social Security number, an Employer Identification tax number, or a customer ID number. •Lender. An alphanumeric identifier number assigned to an originated loan by the lender. •General Ledger. A General Ledger number in the financial institution’s format. |
Lookup fields |
Depending on which Linked To option is selected, the lookup fields will contain the appropriate field(s), such as Loan Number or General Ledger Number, to enter for the lookup. Some fields, such as account numbers, will require all data to be entered before the search can be performed, and some, such as Customer Name, will allow you to search with a partial name. The <Search> button will be grayed out if your search parameters are not complete. |
Include Deleted Files |
Check this box if you want to include files that have been deleted but not yet purged from the database in your search. Only users with proper security settings will be able to check this box. |
Search |
Click <Search> to search for all files that match the entered criteria. When GOLDVault is called from another application, such as CIM GOLD, the calling application will set the default search criteria to the account or name displayed in the application and perform the initial search when GOLDVault is loaded. |
User Settings |
When you click <User Settings>, a screen is displayed that allows you to change the temporary file cache folder that you use. See User Settings Dialog below. |
Scan Settings |
When you click <Scan Settings>, a dialog is displayed that allows you to change options your scanner should use when you scan a document. See Scan User Settings Dialog below |
n files found |
This note at the right hand side of the screen in the toolbar line tells how many files are displayed in the file list, where n is the number of files. |
File list fields |
The file list has a number of columns that give information about the file and its corresponding index links. There are several optional columns that provide additional information. To view the optional columns, right-click on any column header and a list of available columns will be displayed. Choose additional columns or remove unwanted columns by checking or unchecking until only those columns you want to view are checked.
Columns:
•File ID. Each file, when added to the database, is assigned a unique number that it will retain throughout its life in the database. Even if you rename a file to have the same name as another file, you can still identify it by its unique file ID. •File Name. This is the name of the file that was originally added to the database, or its current name, if the file has been renamed. •Linked To. The type of related link to the file, such as Loan or Customer. •Link Details. Details of the specific data linked to the file, such as a loan account number or a customer name and customer ID. •Category. The category of this image file. •Subcategory. The subcategory of this image file. •File Type. The file type of this image file. •Retention 1. The number of months to retain this document after the first retention event for the category occurs. •Retention 2. The number of months to retain this document after the second retention event for the category occurs. •File Size. The size, in kilobytes, of the file in the database. •Was Deleted. Yes, if the file has been deleted, but not yet purged from the database. •Link ID (optional column). When a link is added to a file, the link is given a unique identifying number. The link ID is used internally in the program and probably has very little value for users. •Comments. Tells whether comments are associated with this file. •Date Linked (optional column). Gives the date that the link and the file were linked together. •Date Uploaded (optional column). Gives the date that the file was added to the database. •Last Updated (optional column). Gives the date that a change was last made to the file, such as adding another link or renaming the file. •Date Dropped (optional column). Gives the date that the file was deleted. If the file has not been deleted, this date shows as 01/01/0001. |
Several actions can be performed on highlighted files. To perform an action, highlight the desired files, then click the appropriate icon in the toolbar, or right-click and select the appropriate menu item.
Export |
Export the highlighted files from the database in their encrypted, compressed forms to a designated folder. The files will be stored in the specified folder, expanded, unencrypted, and in their appropriate file types with the file name given in the file list. This option is controlled by user role security. |
Transfer |
Transfer is used to change the attached link from one link to another. Use this function, for example, to change the account number the file is linked to, or to change the name it is linked to. Refer to the Transfer Links screen documentation for more information on how to do this. This option is controlled by user role security. |
Email the highlighted image files using the institution and user settings previously defined. In order for email to be available, the institution and user settings must be defined, you must have role security to allow emailing, and the file type must allow emailing. Refer to the Email Settings screen documentation for more information. |
|
Print the highlighted files from the database in their encrypted, compressed forms to a designated printer. This option is controlled by user role security. |
|
Upload and Link Files |
Open the Upload and Link Files screen, which will allow you to add additional files and links to the database. When you open Upload and Link Files from this screen, all links displayed on this screen are made available as possible links on the Upload and Link Files screen. Refer to the Upload and Link Files screen documentation for more information on how to do this. This option is controlled by user role security. |
Add Link to File |
This opens the Attach Files screen, which will allow you to add additional links to the highlighted files. When you call Attach Files from this screen, all links displayed on this screen are made available as possible links and all highlighted files are placed in the possible files list on the Attach Files screen. Refer to the Attach Files screen documentation for more information on how to do this. This option is controlled by user role security. |
Delete |
Delete the highlighted files from the database. When a file is deleted, its associated link is marked as deleted. If all links are deleted from a file, the file is also marked as deleted. Deleted relationships and files can still be viewed, with proper security, by checking the Include Deleted Files checkbox. Deleted files and links will remain on the system until they meet the retention criteria. Once files have met the retention criteria, deleted files are purged from the database and are no longer available. This option is controlled by user role security. |
View |
View the first highlighted file. This can also be done by double-clicking a file. |
View/Edit Related File Links |
Open the View/Edit Related Links screen, which will show all links to the file (for example, the name and the account attached to the file), and with proper user role security, will allow you to change the file name and/or change the document category, subcategory, and file type and retention months for the file. Refer to the View/Edit Related Links screen documentation for more information on how to do this. |
View History |
View history for the first highlighted file. Refer to the History screen documentation for more information on how to do this. |
View/Edit Comments |
Click this button and the "Cross Reference Comments for" dialog will be displayed. You can look at, edit, or add comments in this dialog. |
Copy |
(Right-click menu only.) Copy the data in the highlighted cells of the list to the Clipboard. You can then paste the data into Notepad, Excel, or other applications. |
The following dialogs are accessed through this screen.
User Settings Dialog. This dialog is accessed by clicking <User Settings> on the View Attached Files screen. It allows you to change the temporary file cache folder that you use. This temporary folder is used as a work folder when exporting, emailing, printing, or viewing files. Files in the folder are deleted when your work session is completed.
The User Settings are unique to each user. If multiple users are adding export files, they will each need to set up their own user settings appropriately. There is no institution default setting.
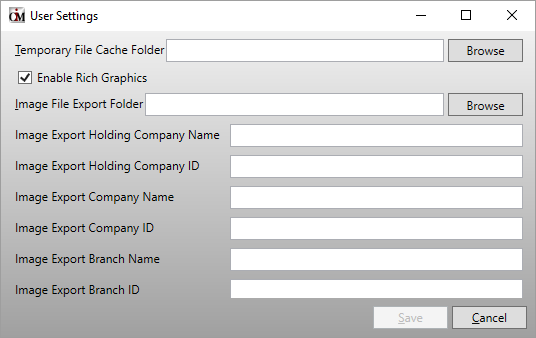
•Temporary File Cache Folder. This is the folder to use for your temporary files. You can also use the <Browse> button to locate the folder.
•Enable Rich Graphics. Check this box to enable rich graphics.
•Image File Export Folder. Enter the full-path folder name in this field of the folder where the exported images files are to be saved. You can also use the <Browse> button to locate the folder.
•Image Export Holding Company Name. This field is used in Active View exports to designate the name of the holding company of the bank. If the bank does not have a holding company or if Active View is not set up with a holding company, this field should be left blank.
•Image Export Holding Company ID. This field is used in Active View exports to designate the identification number of the holding company of the bank. If the bank does not have a holding company or if Active View is not set up with a holding company, this field should be left blank.
•Image Export Company Name. Enter the bank name in this field.
•Image Export Company ID. Enter the identification number used by Active View for your bank.
•Image Export Branch Name. Enter the name of the branch submitting the export. If Active View does not save images by branch, leave this blank.
•Image Export Branch ID. Enter the branch number submitting the export. If Active View does not save images by branch, leave this blank.
•Save. Click the <Save> button to save the change to your temporary folder.
•Cancel. Click the <Cancel> button to leave without making changes.
When the above settings are selected and filled in, GOLDVault will save a copy of the image file and the image header information file in the export folder each time a new file that has a file type with a non-zero export format is added to the system. When files are added in a pending state, they are saved in the export file when the pending file is accepted. The image header information contains all the links attached to the exported file, such as account link, customer link, etc.
Scan User Settings Dialog. This dialog is accessed by clicking <User Settings>. It allows you to change options your scanner should use when you scan a document.
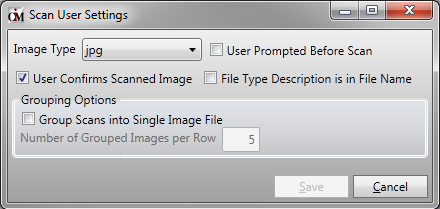
•Image Type. Select the type of image you want your scanner to create when you scan a document. The preferred type is tif.
•User Prompted Before Scan. Check this if you want a pop-up message to prepare the scanner before you begin your scan.
•User Confirms Scanned Image. Check this if you want a pop-up message after the scan is complete before it copies the scanned image to your temporary folder. This will allow you to view your scanned image and rescan it if it needs to be adjusted.
•File Type Description is in File Name. Check this if the file type description is included in the file name.
•Group Scans into Single Image File. Check this if you want all pages of a scanning session to be combined into a single file. If you do not check this, each page will be saved as a separate file.
•Number of Grouped Images per Row. When you scan multiple documents into a single image file, enter how many documents you want to display per display row when displaying the image file.
|
Next topic: Upload and Link Files Screen |
|
Previous topic: Definitions |