Navigation: VitalView GOLD > VitalView GOLD Setup > Parameters Tab >
Generic Parameters
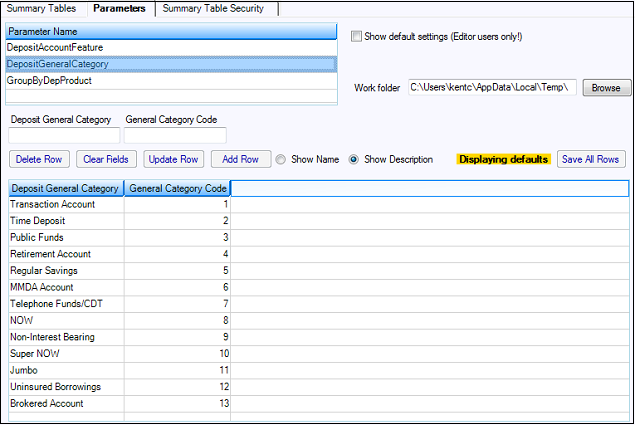
The example below illustrates a generic parameter table list view. Generic parameters have a very specific table format and allow very little editing. A row of fields above the list view is used to add and edit row data. Click on a parameter in the list view to display it for editing. If you make changes to the data in the list view, the data is not permanently saved until you click the <Save All Rows> button.

The fields in the lower portion of the screen are described below. (The fields in the upper portion of the screen are described in the Parameters Tab.)
Field |
Description |
|---|---|
Show Name and Show Description radio buttons |
Each field has a field name and a field description. If you would rather view fields by their longer description than their shorter name, click the Show Description radio button. Clicking Show Name will go back to displaying field names. |
Displaying defaults |
Some generic parameters have system default parameters set up if many institutions will be able to use some common parameters.
If the text “Displaying defaults” is displayed in a yellow background just to the left of the <Save All Rows> button (as in the example above), the text displayed on the screen is the default data.
If you change the data and then save it, the default data with your changes added to it will be saved for your institution. The next time the data is displayed, you will not see the “Displaying defaults” message. |
Parameter Table list view |
The Parameter Table list view displays all the fields that are part of the parameter that you selected in the Parameter Name list view above. If you want to edit a field, click on the field and the data will be displayed in the edit fields above this list view. |
Edit fields |
The row of fields above the Parameter Table list view is used for editing existing parameter fields and for adding new parameter fields. |
Buttons
The following buttons are used with the Parameter Table list view.
<Delete Row>
Highlight rows in the parameter table that you want to remove, then click <Delete Row> to remove them.
<Clear Fields>
Click <Clear Fields> to deselect any selected rows in the list view and clear all the edit fields above the list view.
<Update Row>
Clicking a row in the list view displays the row data in the fields above the screen. To change the data, type the new values into the fields, then click <Update Row>. The changes will be displayed in the list view row.
<Add Row>
To add a new row to the parameter table, fill in all the edit fields with the desired values, then click <Add Row>. The new row will be added to the list view.
<Save All Rows>
Click <Save All Rows> to save all the changes you have made to the database. Changes made in the parameter table will not be saved until this button is clicked. If you leave the screen without saving changes, you will be asked if you want to save your changes. If you click <Yes>, your changes will be saved.
|
Next topic: Deposit Product Grouping |
|
Previous topic: Parameters Tab |