Navigation: VitalView GOLD > VitalView Spreadsheet Integration >
Settings Dialog
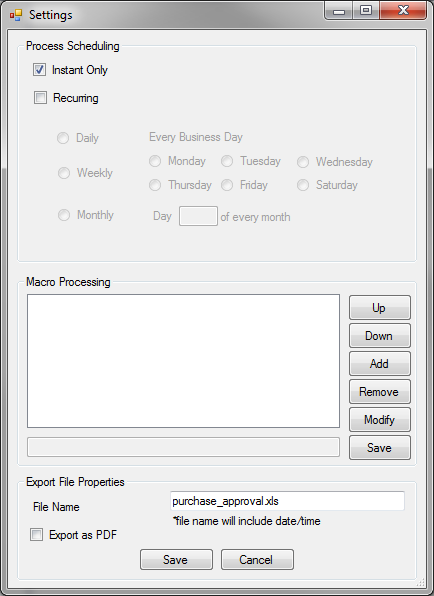
The Settings dialog displays automatically when you import a new spreadsheet. It also displays when you click the <File Settings> button for an open spreadsheet. An example is shown below.

Three main sections of the dialog
1.Process Scheduling
a.The process scheduling section contains all the data for when the spreadsheet will be reproduced and populated with the current mapped data. The options are:
i.Instant only: There is not afterhours processing scheduled. The only way the spreadsheet will be populated is by manually pressing the “Instant Process” button on the main screen.
ii.Recurring: This is where afterhours process is scheduled. The options are:
1.Daily…spreadsheet will be generated every time afterhours are run
2.Weekly…spreadsheet will be generated on the specific day of week. If this falls on a holiday or non-processing day (Saturday), it will be processed the day before.
3.Monthly…on a specific day of the month. If this falls on a holiday, a non-processing day, or a non-existent day (Feb. 31st), it will be processed the day before.
b.It is important to note that in the case of holidays, non-processing days, or a non-existent day, processing will happen before the specified date.
2.Macro Processing
a.The Macro processing section contains all the data for processing macros after the spreadsheet has been populated with data. Currently, there is no way to determine whether a spreadsheet contains macros, or the order of macros to be run. Macro processing sections allows:
i.“Add” button…add a new macro.
1.The user must key in the macro name just as it is found in the workbook macro section.
2.If a macro name is keyed in incorrectly, the macro will not be found and therefore will not be run.
ii.“Remove” button…removes the selected macro from the list.
iii.“Modify” button…allows the user to modify the name of the macro.
iv.“Up” button…moves a selected macro up the list.
v.“Down” button…moves a selected macro down the list.
vi.“Save” button…saves the ordered list of macros.
b.It is important to note that macros must be named exactly as they are in the workbook and that the macros will be run in the order that they are shown in the list.
c.Macro limitations: (see limitations for macros). If the worksheet or work book is protected, then macros will not be able to run.
3.Export File Properties
a.The Export files Properties section is where the output file name is designated and the Export as PDF flag is set.
i.The file name will be used just as entered. The default file name is the name of the file. When processed, the file name will be appended with a date/time stamp to ensure that there are no duplicate files produces (ie. MacroTest2-9172013123816.xls)
ii.If the Export as PDF check box is checked, then the excel file is exported as a .PDF file and the excel file removed. There will not be a .XLS and a .PDF file with the same name.
Click <Save> to save the changes to the Settings dialog. If the Settings dialog is a result of an import, the import will also be saved.
or
Click <Cancel> to cancel the changes to the Settings dialog. If the Settings dialog is a result of an import, the import will also be canceled.
|
Next topic: |
|
Previous topic: Importing a New Spreadsheet |