Navigation:  Account Delinquency screen >

Names tab

Navigation:  Account Delinquency screen >

Names tab

Previous pageReturn to chapter overviewNext page  Print this Topic

The Names tab is found on many screens in the CIM GOLD Loan system. It contains name and address information about borrowers on the account. See the following example of this tab:
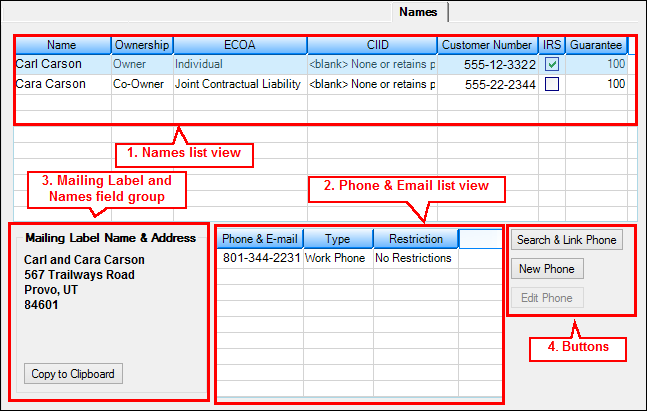
 

Names Tab

Names Tab


This tab contains:


1.Names list view

2.Phone and Email list view

3.Mailing Label Name & Address field group

4.Buttons, as described below.


1. Names list view

This list view shows the borrowers' names, tax ID numbers, ownership, and what percentage of the loan they are obligated for. It contains the following columns:


Name

This column displays all borrowers connected to this loan. This information is provided when the loan is originally opened.

Ownership

This displays the type of ownership for the account. This can be changed through the Entity Linkage screen in CIS. This information is provided to the credit repositories during the monthly credit reporting process.


Note: You can also make changes to this field using the Loans > Collections > Bankruptcy Information screen > Names tab.

ECOA

This is the Equal Credit Opportunity Act code. The ECOA requires that a borrower's relationship to an account be disclosed for the purposes of establishing equal credit for all involved. This information is provided to the credit repositories during the monthly credit reporting process.


Note: You can also make changes to this field using the Loans > Collections > Bankruptcy Information screen > Names tab.

CIID

The Consumer Information Indicator is used to report to credit repositories the status of a bankruptcy pertaining to the borrower. These codes are defined by the credit repositories and cannot be changed. They are established when any of the available bankruptcy transactions are run using the Bankruptcy Transaction screen.


Note: You can also make changes to this field using the Loans > Collections > Bankruptcy Information screen > Names tab.

Customer Number

This is the social security/employer identification/customer identification number.

IRS

If this field is marked, it indicates that the borrower is considered the owner of the account for IRS reporting purposes.

Guarantee

This displays the percentage the borrower is responsible for on the account. This is generally 100 percent for each borrower.

2. Phone & Email list view

This list view shows the phone number and/or e-mail address of the borrower selected in the Names list view, as well as whether there are restrictions for that number. File maintenance or new phone information can be added from this screen by using the appropriate buttons.


Note: Changes to e-mail information must be done through the Entity Maintenance screen for a person or business.

3. Mailing Label Name & Address field group

This field group displays the name and address information that is set up for the mailing label. Up to six lines are displayed.


If there is a mail restriction such as "Do Not Mail," it will be displayed. Restrictions are set up on the CIS > Entity Maintenance - Mailing Label screen for the account.


You can copy and paste the mailing information by completing the following steps:


1.Right-click in the Mailing Label Name & Address field group you want to copy, then select "Copy."

2.Go to where you want the mailing information; for example, a word-processing document.

3.Right-click, then select "Paste."


Click the buttons on the bottom of this tab to make changes to the information, as described in the following table:


Button

Description

searchandlinkphonebutton

Click this button to search for a phone number to see if it has already been set up in CIS. If it has, you can link that number to the borrower. For example, if a phone number for one spouse is in CIS, to link it to the other spouse, click the name of the other spouse and click searchandlinkphonebutton. Enter the phone number in the Search Parameter field. Highlight the phone and press <OK>. The Link Entities dialog will appear. Select the type of link and press linkbutton.

newphonebutton

To add a new phone number, select a name in the list view and then click newphonebutton. Add the phone information and click <Save Changes>. The Link Entity dialog will appear. Select the type of link and press linkbutton.

editphonebutton

To edit an existing phone number, click on a phone number in the list view and click editphonebutton. The CIS Phone Edit dialog will appear. After making the appropriate changes, click <Save Changes>.


©2024 FPS GOLD. All rights reserved.