|
Creating MICR Check Ranges |
  

|
Navigation: Setup > Administrator Options > MICR Check Printing >
Creating MICR Check Ranges
|
Creating MICR Check Ranges |
|
CIM GOLDTeller Functions menu > Administrator Options > MICR Check Form Designer
In order to use CIM GOLDTeller MICR checks, you must set up check ranges for each type of check you designed on the MICR Check Form Design screen. One check type can have several different check ranges, if desired.
Check ranges are set up by selecting Functions > Administrator Options > MICR Next Check Number in CIM GOLDTeller. See the following example of this screen:

CIM GOLDTeller > Functions > Administrator Options > MICR Next Check Number
To set up check ranges:
1.Access the MICR Next Check Number screen (CIM GOLDTeller > Functions > Administrator Options > MICR Next Check Number, as shown above.
2.Click <Create New Check Range>. The New Range Setup screen is displayed, as shown below.
3.Select the check format you want to set up a range of check numbers for in the list view box at the top of this screen. This list is populated when check formats are set up on the MICR Check Format Design screen. The Check Type and Check Sub-Type fields will reflect the check format you selected.
4.Enter the office number used for this check range. Each office can have a unique check range for the same type of check.
NOTE
To make the check number range universal for all offices, use office zero (0). |
5.Enter the initial check number to want to start with in the Check Number field. If this number is not included in the range of checks you enter in the Start and End Check Range fields, you will receive an error message that states this starting number must be within the range.
6.Enter the starting check number for this range in the Start Check Range field.
7.Enter the ending check number for this range in the End Check Range field. If this value is exceeded during the check printing process, CIM GOLDTeller will stop and require administrative actions to continue.
8.Click <OK>. The check range you set up will be displayed in the list view on the Get Next Check Number Admin screen.
You can lock a check number or range of numbers to prevent it from being used for MICR checks until another administrator unlocks the check number or range.
To lock a check number range:
1.Select the check number range you want to lock in the list view.
2.Click <Lock Selected Check Item>. A locked check range is indicated by a red color in the list view, as shown in the example above.
To unlock a check number:
1.Select the check number or range you need to unlock.
2.Click <Unlock Selected Check Item>.
You can also increment and unlock a check number. This should generally only be done if an error has occurred that requires a check number to be advanced and unlocked. This is an automated process that happens during check printing in CIM GOLDTeller.
To increment and unlock checks:
1.Select the check range you want to increment and unlock from the list view.
2.Click the <Increment & Unlock Selected Check Item>.
If a check error has occurred and a check sequence has been advanced by mistake, you can reverse (subtract) the check number and unlock the check number.
To reverse and unlock a check number:
1.Select the check number or range you need to reverse and unlock from the list view.
2.Click <Reverse & Unlock Selected Check Item>.
WARNING
Reversing and unlocking a check number should be done as a last resort to fix an error because it may cause an error in Check Reconciliation. Every effort has been made to perform this process during CIM GOLDTeller check printing if an error has occurred. |
Sometimes when preparing to print a MICR check in CIM GOLDTeller, the teller requests the next available check number, and that check number exceeds the bounds (the check range). In this case, check printing will be halted until it is fixed.
The Reset Check Number and Range dialog box allows you to reset a check number or range so that normal MICR check printing can proceed.
To reset a check number:
1.From the Get Next Check Number Admin screen, select the check range you want to renumber in the list view.
2.Click <Reset Selected Check# and/or Range(s)>.
The Reset Check Number and Range screen is displayed, as shown below.
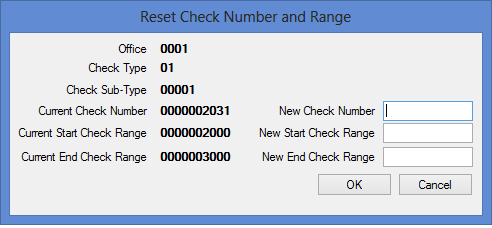
3.Enter the new check number or the range of check numbers in the designated fields, then click <OK>.
NOTE
If you are only resetting the check number, it is not necessary to adjust the check ranges. |
You can delete a check number range, if necessary.
WARNING
You cannot reverse the deletion. You should never delete active MICR check ranges. |
To delete a check number range:
1.Click on the Functions menu > Administrative Options > MICR Next Check Number.
2.In the Get Next Check Number Admin dialog box box, select the range you want to delete.
3.Click <Delete Selected Check Range>. Or right-click and select <Delete Selected Check Range> from the pop-up menu.
Click <Refresh Grid> to re-read and refresh all the current MICR check number setups.