|
Menu Design |
  

|
Navigation: Setup > Administrator Options >
Menu Design
|
Menu Design |
|
GOLDTeller Functions menu > Administrator Options > Menu Design
Menu Design allows you to customize the Transaction menu tree.
You can customize the following menu types:
1.Default – All tellers use the same menu. This menu may also be customized.
2.Individual – Each teller may have his or her own menu assignment.
3.Profile – A security group can be customized for tellers assigned to a specified profile.
The hierarchy of menus used is Individual Menu, Profile Menu, and then Default Menu. Before making changes, determine the type and name of the menu to create or edit.
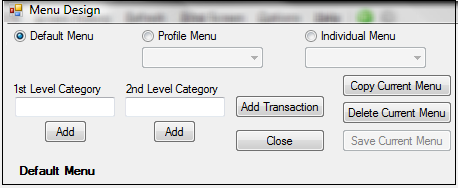
•Default Menu - This is the menu displayed and selected when first accessing this option. The Default Menu is generally used if only one menu is used per institution. All tellers initially default to this menu.
•Profile Menu - This option enables a menu to be set up that multiple tellers could share. This allows a menu to be customized to fit a particular job description, and then each teller under that description will share it. To select this menu, click the radio button <Profile Menu>. From the drop-down list, select the profile name, which will now allow for menu setup or maintenance.
NOTE
A profile must first be set up in CIM GOLD Security before the profile may be selected and assigned to a teller. |
•Individual Menu – This menu enables individual tellers to have a customized GOLDTeller menu. To select this menu, click the radio button Individual Menu and then select the desired user from the drop-down list.
NOTE
An individual teller must first be setup with security before he or she may be selected and assigned an individual teller menu. |
•<Copy Current Menu> – Use this option to quickly copy an existing menu to another individual or profile. The default menu may also be selected and updated.
To copy a menu:
1.Select the menu you want to copy in the Menu Design list view on the left of the screen.
2.Click <Copy Current Menu>. The following dialog box box displays:
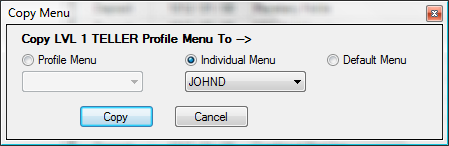
3.Click the radio button next to the type of menu (Profile, Individual, or Default) you want to copy the menu to, then click <Copy>. For the copy to take effect, click <Save Current Menu>.
To delete a menu:
1.Select the menu you want to delete in the Menu Design list view on the right of the screen.
2.Click <Delete Current Menu> to remove all menu records for the selected menu.
3.A confirmation dialog box box will display. Click <Yes> to delete the menu.
You can add categories and transactions to a menu. See the illustration below.
•1st Level Category – Cashiers Checks etc. is an example of a 1st Level Category.
•2nd Level Category – No Account is an example of a 2nd Level Category.
To add a 1st or 2nd Level Category:
1.Highlight the position in the menu where the new category name will be added. The new category will be inserted after the highlighted menu category.
2.Type a label for the new category in the 1st Level Category text box or in the 2nd Level Category text box.
3.Click <Add>, which will show the new category name in green and its menu position.
4.Click <Save Current Menu> to keep this new category name.

GOLDTeller Functions menu > Administrator Options > Menu Design Screen
To add a transaction:
1.Highlight the position in the menu where the transaction needs to be placed. The new transaction will be inserted after the highlighted menu transaction.
2.In the Available Transactions List, highlight the transaction, then click <Add Transaction>. The proposed addition will now appear in the menu in green.
3.Click <Save Current Menu> to keep the new transaction.
NOTE
A category or transaction can be repositioned within the menu by dragging and dropping it. An item that has been moved displays in red. |
Changes made to individual transactions are handled in Transaction Design.
To delete a category or transaction from the menu:
You can delete a category or transaction from the menu. You can rename a category but not a transaction.
1.Right-click on the item, which will open a new menu. Click "Delete Menu Item" or "Rename Menu Item."
2.Click <Save Current Menu> to keep your changes.
After creating a new individual or profile in Security Setup, the user may now select that desired profile or Individual from the appropriate drop-down list. Upon selecting the desired name or profile, if no existing menu is found, the institution default will be used as a beginning template. Transactions may now be added or removed as needed.
This list at the bottom right of the screen displays a complete record of all existing menus currently found on the GOLDTllr.dat file being used by the PC. Highlight any listed user to see the related menu.