Navigation: »No topics above this level«
Use the Print Notices screen in GOLD ExceptionManager to print overdraft, return, and paid notices for your customers. Once selections are made on this screen, they will be persistent each time you access this screen. Exception items are stored on the system for two years and then deleted.
NOTE
For exception items in GOLD ExceptionManager with Host Posted (no fee) that have a primary reason such as account negative, large check, stop suspect, etc., a notice is not generated. If a fee is charged, then a notice will be available. Accounts with Overdraft Codes of 8, 9,10, and 11 do not create Overdraft Notices as they process sweep transactions not overdraft transfers. |
To print notices:
| 1. | Access the Print Notices screen under GOLD Services > GOLD ExceptionManager > Print Notices in the tree navigation. |
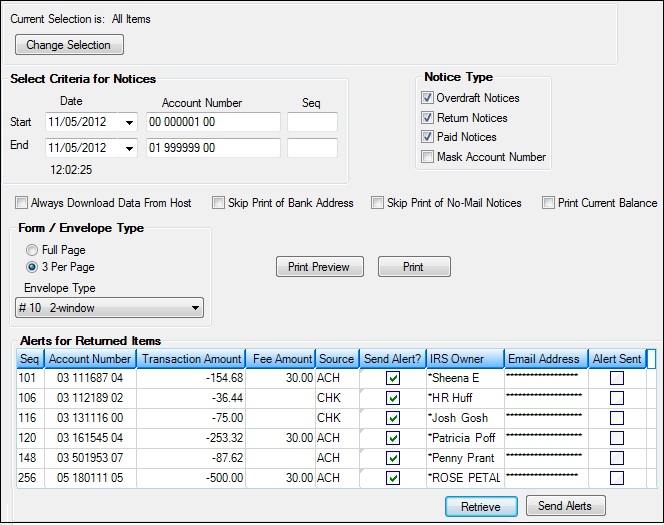
| See the following example: |

| 2. | If the current selection is not what you want to use, click <Change Selection>. The Selections Setup dialog box is displayed, where you can choose a different selection. These selections are institution defined but can be used by any processor. Find the exception item source listed for what you want to print, then proceed to step 3. For more information about selections, see the Selections screen help. |
| 3. | Enter the Start and End Date range, Start and End Account Number range, and Seq number range that you want to print notices for. |
| 4. | In the Notice Type field group, the default setting prints each of the three notices. You can change the default setting by clicking on the checkbox next to either Overdraft Notices, Return Notices, or Paid Notices to print only one type of notice at a time, a combination of notices, or all three. If you checkmark the Mask Account Number field, only the last four digits of the account number is printed on notices and asterisks (*) appear for the remaining numbers. All these boxes remain checked once they have been selected. |
| 5. | Check the Always Download Data From Host if you have not refreshed the items before accessing this screen. You should not print notices until you have the most current data. |
| 6. | If you do not want to print your bank's address on the notices, check the Skip Print of Bank Address checkbox. |
| 7. | If you do not want to print notices to customers who have "Do Not Mail" indicators on their accounts, check the Skip Print of No-Mail Notices checkbox. |
| 8. | If you want the current account balance to appear on the notice, click the Print Current Balance checkbox. If not selected, the balance at the time of the transaction will be printed on notices. |
| 9. | Select which form and envelope type you want printed for these noticed in the Form/Envelope Type field group. For combined notices, the form must be set to Full Page. Once you determine the envelope type, this field should not be changed. |
| 10. | Click <Print Preview> to preview all notices before printing them, or click <Print> to print the notices to a designated printer. |
| 11. | In addition to printing a return notice to paper for account owners, you can also send them an email alert message (or other type of alert such as a text alert) notifying them that checks or ACH items were returned. Click <Retrieve>, and all returned items (Status is R, Returned) will be displayed according to the options selected in the Selection Criteria for Notices field group. For more information on sending alerts, see Sending Alerts for Returned Items. |
To set up additional options for the Print Notices, such as headings for the notices, default envelope type, and combined notices, see the help on the GOLD Services > Institution Options screen, GOLDException Manager tab.