Navigation: VitalView GOLD > VitalView GOLD Setup > Parameters Tab >
Loan Type Grouping
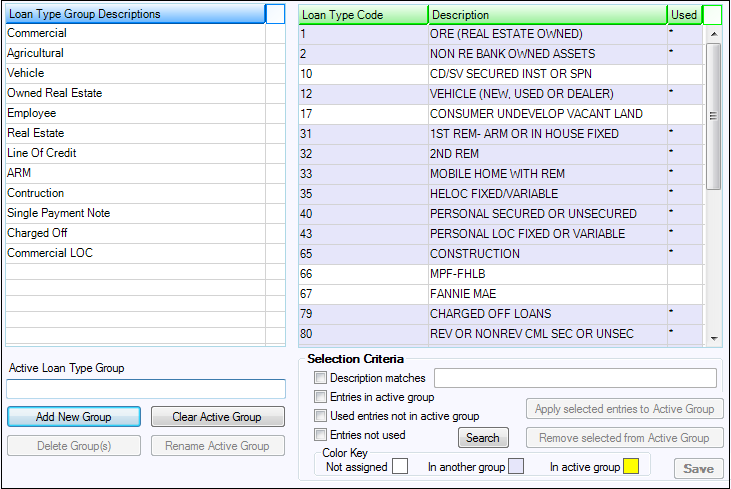
Below is an example of the Loan Class Group parameter.

Loan Type Grouping
The fields in the lower portion of the screen are described below. (The fields in the upper portion of the screen are described in the Parameters Tab.)
Field |
Description |
|---|---|
Group Descriptions list view |
The list view on the left shows the groups you have defined. Selecting one of these groups makes it the active group. The codes belonging to the active group will be highlighted in yellow in the Code and Descriptions list view. |
Code and Descriptions list view |
The list view on the right shows each valid code and description of the type being processed. In this example, the list view shows product codes and product code descriptions. If you right-click a row in the Code and Descriptions list view and select the Activate Group menu item, the parent group of the selected row will be selected to be the active group. |
Active Loan Type Group text box |
When a group is selected, the active group is listed here and the box is protected. If no active group is selected, you can type the name of the new group here, then click <Add New Group> to add the group. |
Selection Criteria field group |
The checkboxes and buttons in this field group control what is displayed in the Code and Descriptions list view on the right side of the screen. |
Description matches checkbox |
When this is checked, only those items that contain the text in the text box to the right will be displayed when <Search> is clicked. If this is not checked, the search does not match text in the text box. |
Entries in active group checkbox |
When this is checked, entries that are in the active group are displayed when <Search> is clicked. |
Used entries not in active group checkbox |
When this is checked, entries that are assigned to a group but not to the active group are displayed when <Search> is clicked. |
Entries not used checkbox |
When this is checked, entries that have not been assigned to any group are displayed.
Note: For the three entries checkboxes above, if none of them are checked, all items are displayed. If you want all of them, you could check all three boxes or none of the three boxes and get the same result. |
Color Key field group |
The color key is for convenience only and has no associated action. It shows that the background color of rows not assigned to any group are white, rows assigned to a group but not to the active group are lavender, and rows assigned to the active group are yellow. |
Buttons
The following buttons are used with the Loan Type Group parameter.
Apply selected entries to Active Group
To assign codes to a group, first select an active group and then select a row or rows in the Code and Descriptions list view that you want to assign to the active group. Click <Apply selected entries to Active Group> to complete the assignment. You can assign codes to a new group using this process. For each code that has been previously assigned to another group, the program will ask if you are sure you want to change the assignment.
Remove selected from Active Group
To remove codes from an active group, first select and active group and then select the row or rows that you want to take out of the group. Click <Remove selected from Active Group> to remove the assignment. If you select rows that are not part of the active group, they will be ignored and their status will not change.
The fields in the lower portion of the screen are described below. (The fields in the upper portion of the screen are described in the Parameters Tab.)
|
Next topic: General Ledger Account Grouping Parameters |
|
Previous topic: Loan Class Grouping |