Navigation: »No topics above this level«
Variable queues allow the institution to build "selection criteria," similar to using GOLDWriter, which determines what queue a loan will appear in (e.g., one queue could pull all loans that are 30 days delinquent while a second queue could pull all type 10 loans that are 60 days delinquent, etc.).
Use of the variable queues is extremely flexible. It allows you to create a limitless number of queues that can be very specific.
Only employees with file maintenance security for Variable Queue Setup will be able to create and update queues or alter an employee’s assigned queues.
A daily report, Variable Queue Report (FPSRP191), is available that displays information for delinquent loans in the variable queues.
Note: Any changes made to the Variable Queue Setup screen will need to run through the afterhours in order to update.
Note: You can control at what point after the due date a loan is considered delinquent (past the due date, past the grace days, or more than one frequency delinquent) by using the Collection Options screen.
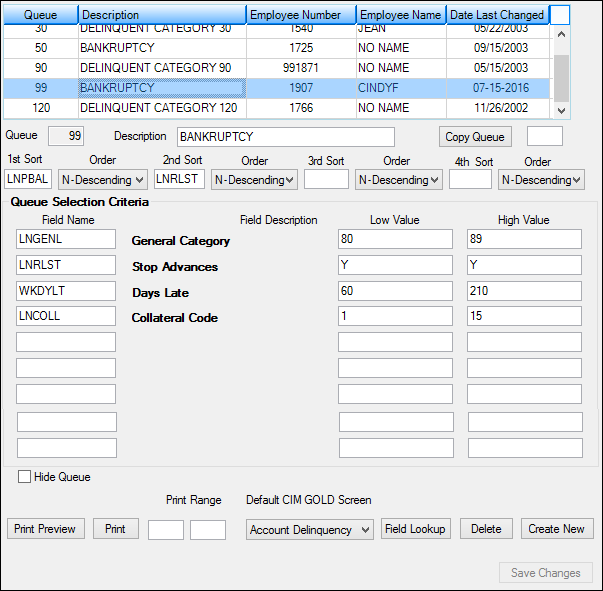
The following is an example of this screen:

Loans > Collections > Queues > Variable Queue Setup Screen
Buttons
Button |
Description |
|---|---|
|
Click this button to display the Field Lookup dialog. This dialog displays all the fields available to be used in the queue, including the loan record fields (CFLN) and the work fields (CQ). You can then select the fields that you want to add to the selection criteria. You can also type in the mnemonic and click |
|
Click this button to delete a queue. Once a queue has been deleted, it cannot be retrieved. |
|
Click this button to create a new queue. |
|
Click this button to preview all the queues. You can also restrict the queues previewed by entering a range in the Print Range fields. This displays the detail for all queues that have been set up. |
|
Click this button to print all the queues or to print the range of queues in the Print Range fields. |
|
Click this button to save any changes you have made to the queue. |
Copying a Variable Queue
To copy a variable queue:
| 1. | Click |
| 2. | Enter the new queue number in the Queue field and the title of the new queue in the Description field. |
| 3. | Enter the number of the queue you want to copy into the field next to the |
| 4. | Click |
| 5. | Make the necessary changes to the new queue; for example, change the pull fields and be sure to change the name of the queue. |
| 6. | Click |
OR
| 1. | Enter the number of the queue you want to copy into the field next to the |
| 2. | Click |
| 3. | Enter the new queue number in the Queue field and the title of the new queue in the Description field. |
| 4. | Make the necessary changes to the new queue; for example, change the pull fields and be sure to change the name of the queue. |
| 5. | Click |
Field Descriptions
See the following links to descriptions of fields on the Variable Queues Setup screen:
Queue Selection Criteria field group