Navigation: VitalView GOLD > VitalView GOLD Setup > Parameters Tab >
Time Period Parameters
Some summary tables allow you to summarize by time periods. For example, you can summarize teller transactions into half-hour intervals of the day to view when transactions are processed over a period of time. The time parameters always have three fields: Period Name, Start Time, and End Time. The screen provides some help for you so you don’t have to enter every single time period manually.
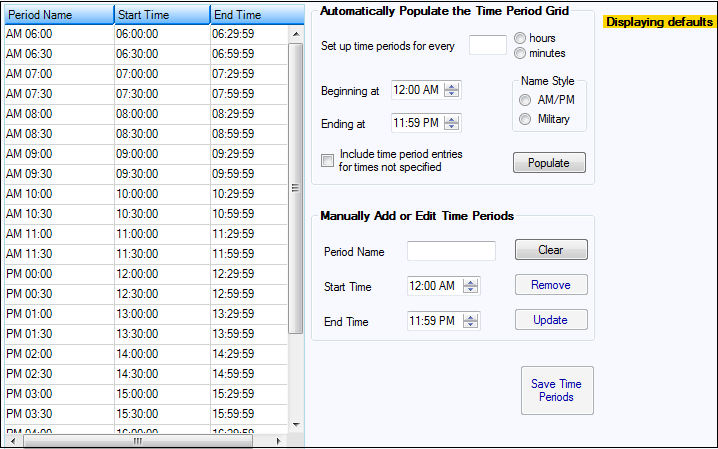
Like the other parameter types, the time period parameter has the capability to display default parameters. If the text “Displaying defaults” is displayed in a yellow background just to the left of the <Save All Rows> button (as in the example above), the text displayed on the screen is the default data.
If you change the data and then save it, the default data with your changes added to it will be saved for your institution. The next time the data is displayed, you will not see the “Displaying defaults” message.
The screen appears as follows:

Time Period Parameters
Column |
Description |
|---|---|
Period Name column |
The period name can be any name you want to give it. When the system automatically chooses the name, the name is the beginning of the time period, such as “AM 06:00,” as seen above. |
Start Time column |
This is the period start time in 24-hour format. The start time is included within the period. |
End Time column |
This is the period ending time in 24-hour format. The end time is included within the period. |
Automatically Populate the Time Period Grid field group |
Items in this field group are used to tell the program how to automatically build the time periods. |
Set up time periods for every |
Enter the number of minutes or hours you want to be included in each time period, then select the appropriate Hours or Minutes radio button. |
Beginning at |
Select the beginning of the first time period. |
Ending at |
Select the ending of the last time period. |
Name Style |
Select AM/PM if you want your time listed in 12-hour times with AM or PM. Select Military if you want times listed in 24-hour format. |
Include time period entries for times not specified checkbox |
Check this box if you want to add additional time periods for the times before the beginning time and after the ending time. |
Manually Add or Edit Time Periods field group |
Items in this field group are used to modify time period settings after they have been automatically calculated or manually entered.
To edit an existing time period, select the period in the list view. When it is selected, it will fill in the Period Name, Start Time, and End Time fields of the field group. Make the appropriate changes as needed, then click <Update>
To delete time periods, select the time periods to delete in the list view, then click <Remove>.
Click <Clear> to deselect selected time periods and to clear the fields in the field group.
To add a new time period, enter the desired Period Name, Start Time, and End Time fields, then click <Update>. |
Buttons
The following buttons are used with time period parameters.
<Populate>
Clicking <Populate> will delete all current time periods and calculate new time periods following the instructions supplied by the options in the Automatically Populate the Time Period Grid field group.
<Save Time Periods>
Changes to the time period list view are saved to the database when you click this button. If you leave the screen without clicking the button, you will be asked if you want to save your changes. If you click <Yes>, your changes will be saved.
|
Next topic: Summary Table Security Tab |
|
Previous topic: General Ledger Account Grouping Parameters |