Importing Transactions |
  
|
Navigation: App. F - G/L Transaction Entry in CIM GOLD > Transaction Entry Screen Details > Posting G/L Transactions >
Importing Transactions |
|
Some institutions have a system in which someone enters General Ledger transaction information into an Excel spreadsheet or other document. Using the Transaction Entry screen, you can import that spreadsheet or document and post the transactions to the FPS GOLD host computer.
NOTE
Your spreadsheet or document does not need to be in the exact format as your configuration setup before you can import it into CIM GOLD. The Configurations screen allows you to designate which column in the import file corresponds with which field on your configurations. See Configurations for more information. |
The following steps describe how to import transaction information you have saved in a file.
To import transactions:
1.After accessing the Transaction Entry screen and entering the control group entry information, select the configuration you want to use for this batch of transactions from the Configurations drop-down list. If you want to create a new configuration, click <Configurations>.
For more information on setting up configurations, see Configurations.
2.Click <Import>.
The Transaction Import dialog box is displayed, as shown below:
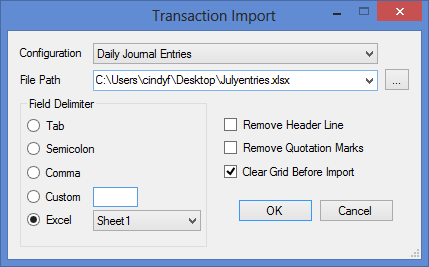
3.Select the configuration you want to use from the Configuration drop-down list. For more information concerning configurations, see Configurations.
4.Click the browse icon to find ![]() and select the file where your transactions are saved. When you double-click on the file, it will automatically be placed in the File Path field. If you are using an Excel file (extension is .xls or .xlsx), the system will automatically extract the worksheet information, and you will need to select which worksheet you want to import (see step 5 below).
and select the file where your transactions are saved. When you double-click on the file, it will automatically be placed in the File Path field. If you are using an Excel file (extension is .xls or .xlsx), the system will automatically extract the worksheet information, and you will need to select which worksheet you want to import (see step 5 below).
5.In the Field Delimiter box, select how each column of information is separated. The columns can be separated by a Tab, a Semicolon, a Comma, a Custom separator, or you can import an Excel file.
•If you use a custom way of separating information (such as a backslash (\) or asterisk (*)), you need to enter the custom separator in the field to the right of the Custom field.
•If you are importing an Excel file, you need to specify which sheet the data you are importing is found on. Only one sheet can be imported at a time.
| 6. | If the data you are importing includes a header line, check the Remove Header Line box. The header line is the first line that has a header name at the top, such as "Account Number, Amount, etc." The system will import the header line but will be marked with an error status. |
| 7. | If the data you are importing includes quotation marks, check the Remove Quotation Marks box. Checking this box discards any extraneous quotation marks from the file. |
For example, when an Excel file is saved as a tab-delimited text file and some of the fields contain punctuation (such as commas or apostrophes), Excel places quotation marks around that field. By checking this box, all such quotation marks will be discarded from the file.
| 8. | Check the Clear Grid Before Import box to clear any information from the Transaction Entry screen, if previous information has already been entered on that screen. If you leave the box unchecked, the information you are importing will be displayed below any information already entered on the Transaction Entry screen. |
| 9. | Click <OK> to start importing the transactions from your file. The system will validate the data that is being imported and error messages will be displayed if values from the spreadsheet cannot be imported to a particular field or column on the grid view. For example, if your configuration has been set up to map data from a particular column on your spreadsheet to the Amount field and the data in your spreadsheet contains alphabetic characters instead of a numeric value, the import process will display an error. |
| The error message will note which row and column in your file the data is not able to be imported from. If you want to stop the import, you can click on the <Cancel> button to stop uploading the file. As soon as the import reaches a row in the file where the data in every column is blank, the upload will stop. If you have blank rows in the middle of your spreadsheet, you will need to manually fix your file and delete them before re-importing. |
| After the import process is completed, the transaction information you imported will be displayed on the Transaction Entry screen in the configuration you selected. Any errors or warnings for any of the transactions will be displayed in the Status field. Errors are displayed with a red icon |