Transaction Entry Screen Details |
  
|
Navigation: App. F - G/L Transaction Entry in CIM GOLD >
Transaction Entry Screen Details |
|
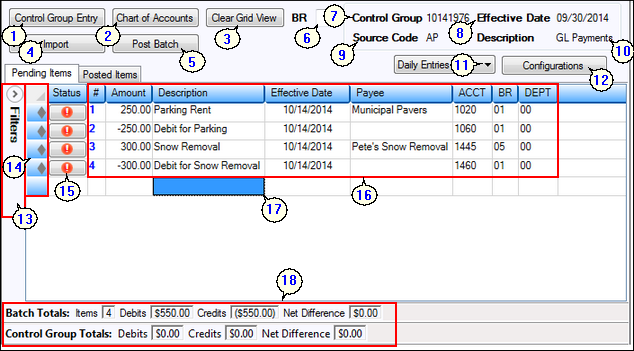
The Transaction Entry screen is used to enter transaction information that you want to post to the General Ledger. This screen is found under Financial Applications > General Ledger > Transaction Entry in CIM GOLD.
The following is an example of the Transaction Entry screen, followed by descriptions of each of the fields.
# |
Field |
Description |
||
<Control Group Entry> |
Click this button to display the Control Group Entry dialog box where you can enter a new or existing control group to post transactions to. |
|||
<Chart of Accounts> |
Click this button to open the Chart of Accounts screen. This screen lists all General Ledger account numbers that have been set up in the General Ledger system. For more information, see Chart of Accounts. |
|||
<Clear Grid View> |
Click this button to clear all the transactions entered or imported in the grid view on the Pending Items tab. You will be prompted to confirm the deletion. |
|||
<Import> |
Click this button to import a file of transaction information that you have saved somewhere else on your computer or network. For more information on importing transactions, see Importing Transactions. |
|||
<Post Batch> |
Click this button to post the batch of transactions you have entered, either manually or by importing a file. Transactions cannot be posted until all error messages are corrected. Error messages appear in the Status column, described below. Once transactions are successfully posted, they will be displayed on the Posted Items tab. For steps on how to post transactions, see Posting G/L Transactions. |
|||
Branch |
You can type a branch number in this field, and when you enter information for the transaction, the system will automatically insert the branch in the designated column. You can type over the branch number in the Fields section once it's been inserted. |
|||
Control Group |
This is the control group of this batch of transactions. The control group is also referred to as the batch number. If the batch number is posted in a different period than the effective date, you may receive an error or warning in the Status column. For more information on how to correct errors, see Common Errors.
This field is not file maintainable once it has been entered on the Control Group Entry dialog box. The Control Group Entry dialog box is displayed when you first access the Transaction Entry screen or when you click on the <Control Group Entry> button. |
|||
Effective Date |
This is the effective date for the control group. The date you enter here will be the effective date of the transactions entered on the General Ledger Transaction Entry screen, unless you manually overwrite the effective date. (You will need to add the Effective Date field to the Transaction Entry screen through the <Configurations> button.) A warning will be displayed if the effective date is not in the current period.
This field is not file maintainable once it has been entered on the Control Group Entry dialog box. The Control Group Entry dialog box is displayed when you first access the Transaction Entry screen or when you click on the <Control Group Entry> button. |
|||
Source Code |
The source code is user-defined. Source codes are used as search parameters for retrieving transactions for correction, review, deletion, etc. You can also enter a code to refer back to the description entered in the Description field. For example, if you entered "Monthly Checks" in the Description field, you could enter "C" as the source code for checks.
The source code displayed here will be the source code when transactions are manually entered on the Transaction Entry screen, unless you overwrite it.
This field is not file maintainable once it has been entered on the Control Group Entry dialog box. The Control Group Entry dialog box is displayed when you first access the Transaction Entry screen or when you click on the <Control Group Entry> button. |
|||
Description |
This field displays the description of the batch, as entered in the Control Group field on the Control Group Entry dialog when you first access the Transaction Entry screen or when you click on the <Control Group Entry> button. The description can be anything you want, but it should be descriptive of the type of entries for these transactions, such as monthly checks, journal entries, accounts payable, etc.
This description will be saved as the transaction description when the transactions are posted, unless you manually overwrite the description for the transactions when manually entering transactions on the Transaction Entry screen. |
|||
Configuration drop-down |
The Configuration drop-down field displays all configurations that are currently set up for your institution (or client number). Select a configuration from this drop-down list, and the fields in the list view on the Transaction Entry screen will change according to how the configuration is set up. See <Configurations> definition below. |
|||
<Configurations> |
Click this button to access the Configurations screen, which allows you to add, edit, and delete configurations. Configurations are used to customize the Transaction Entry screen. |
|||
Filters |
Click the Filter arrow to expand the Filters box. This box enables you to search for specific information in a batch. This tool is especially useful if you've imported a large file of transactions and need to make changes to one or two. For more information, see Filters. |
|||
Diamond
|
Clicking the diamond indicator allows you to copy a row, field, or fields from the diamond row to another row, field, or fields on another row. This is accomplished as follows:
1. Click the diamond on the row to be "copied from." 2. Select (highlight) a row, field, or fields on the row to "copy to." 3. Press the duplicate key ("*" on the 10-key pad). |
|||
Status |
If any errors or warnings exist for the transaction information you entered or imported, this column will display a warning |
|||
Fields |
The columns to the right of the Status column are the fields you will use to enter or import your transaction information. To set up which fields are displayed here, select the configuration from the Configuration drop-down list, or click <Configurations> to set up a new configuration. See the descriptions above.
You can either manually enter information in these fields, or you can import information from a file or spreadsheet you have saved on your computer or network. Pressing <Enter> when you are finished typing information on one line will take you to the next line.
|
|||
17 |
Row Section |
Clicking this row field will select (highlight) the entire transaction line (row). Use <Ctrl+C> to copy this row and <Ctrl+V> to paste this row as a new row. You can also duplicate the selected row directly above the current transaction entry line by pressing the "*" on the 10-key pad. |
||
18 |
Totals |
At the bottom of the Transaction Entry screen are the Batch Totals and Control Group Totals.
The Batch Totals display the number of transactions currently entered in the batch, the total debits and credits for the batch, and the net difference between the credit and debit amounts. The batch does not need to have a net difference of zero, but a warning message will be displayed if you click <Post> when a net difference other than zero does exist. You can ignore this warning if you are sure you want to post the batch.
The Control Group Totals shows totals for all the batches you have posted for this day with the same control group. You can post more than one batch in a day, and the Control Group Totals will display the totals of all debits, credits, and any net differences of all the batches for that date, using the control group number displayed at the top-right of the screen. |
||
19 |
Duplicate Key |
The duplicate key is the asterisk ("*"). It can used to copy the cell above, or the cell in the row selected with the diamond indicator, to a selected cell. It can also be used to copy cells above, or cells on a row selected with the diamond indicator, to a selection of active cells. |