Control Group Entry |
  

|
Navigation: App. F - G/L Transaction Entry in CIM GOLD >
Control Group Entry |
|
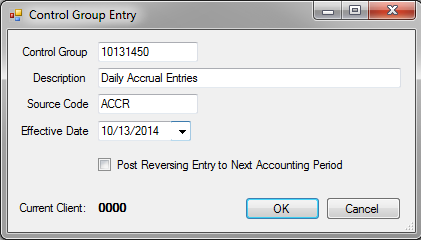
When you first access the Transaction Entry screen or click the <Control Group Entry> button, the Control Group Entry dialog box is displayed (see below). All fields must be completed on this dialog box in order to proceed to the Transaction Entry screen. Click <OK> after completing the fields and they will be displayed on the Transaction Entry screen.
Field |
Description |
|---|---|
This is the control group that the transactions will be posted to. A warning will pop up if the control group you enter is reserved for FPS GOLD. A warning will also be displayed if this control group already exists. Any number up to 8-digits long can be entered, except those numbers reserved for FPS GOLD.
A list of current FPS GOLD-reserved control groups can be found in DocsOnWeb under Other > GOLDServices > Appendix E. The majority of these reserved control groups follow a simple date format (MMDDYYYY), followed by two digits between 00 and 40. |
|
Description |
Enter a user-defined description for the control group in this field. The description should be descriptive of the type of entries for these transactions, such as monthly checks, journal entries, accounts payable, etc. This description will be saved as the transaction description when the transactions are posted, unless manually overwritten when entering transactions on the Transaction Entry screen. |
Source Code |
The source code is user-defined. Source codes are used as search parameters for retrieving transactions for correction, review, deletion, etc. You can also enter a code to refer back to the description entered in the Description field. For example, if you entered "Monthly Checks" in the Description field, you could enter "C" as the source code for checks.
The source code you enter here will be saved as the source code when transactions are entered on the Transaction Entry screen, unless you manually overwrite it. |
Effective Date |
This is the effective date for the control group and will default based on your institution’s options and the current accounting period as set up on the Company Options screen (function 2) in the General Ledger system. If the option is set to default the effective date to today and the current accounting period entered in Company Options matches the calendar month, then the effective date will default to the current date. If the current accounting period does not match the calendar month, the effective date will default to the last day of the current accounting period. So, for example, if the current date is October 28 and the current accounting period entered in Company Options is set to September, the default effective date for your control group will be September 30.
In addition, if the option is set to "Yes" to warn the user if the effective date is not today, then a warning will be displayed if the effective date does not equal the current date. An additional warning will also be displayed if the effective date is not in the current accounting period.
The date entered in this field will be the effective date of the transactions entered on the Transaction Entry screen, unless you manually overwrite the effective date. (You will need to add the Effective Date field to the Transaction Entry screen through the <Configurations> button.) |
Post Reversing Entry to Next Accounting Period |
This box controls whether or not reversing entries are posted to the next accounting period. If this box is checked, reversing entries will be posted to the next accounting period.
All signs in the batch created in the next fiscal month are reversed on each line item, and the literal, "-RVS", is added to the end of your transaction descriptions. For example, the description "TEST" would become "TEST-RVS." Leave this box blank if you do not want to create a posting to the next period. |
NOTE
When posting transactions in the General Ledger, the system checks the Maximum Future Days field on the Company Options screen before processing. The Maximum Future Days field allows you to set a date restriction for the effective date on your control group or transactions. If the difference between the current date and the Effective Date you entered is greater than the number of days allowable in the Maximum Future Days field, the following error appears: "Invalid MAX FUTURE DAYS range selected." |
After you have completed the entries on the Control Group Entry screen, click <OK>. The Transaction Entry screen is displayed. This screen allows you to input data according to the various fields you establish when you configured the screen (see Configurations for more information). To enter transactions on the Transaction Entry screen, enter the information requested by each field. Each Transaction Entry screen must have the following fields:
•All account number sub-fields that have been used
•Amount field
For more information concerning each of the fields you can use, see Customizing the Transaction Entry Screen.
You can manually enter information in each of the fields, or you can import transactions that will be loaded automatically onto this screen. Once all transactions are listed, post the batch of transactions to their designated accounts.