Navigation: »No topics above this level«
Collection Queues Overview
Collection queues are individual lists of delinquent loans sorted by your institution's specific criteria during afterhours processing, to be made available the following day for collectors to begin their collection activity.
Setting up Collection Queues should be done in the following order:
1.Set up which loans appear in which queues by using the Variable Queue Setup screen. This screen is used to actually set up the queues.
2.Use the Queue Assignments to assign employees to specific queues.
3.Define collection categories using the Loans > System Setup > Collection Categories screen.
4.Establish your institution's contact person, as well as other options, on the Loans > System Setup > Collection Options screen.
5.Access the Collection Queues screen to actually record collection efforts regarding accounts.
Collection Queues Screen
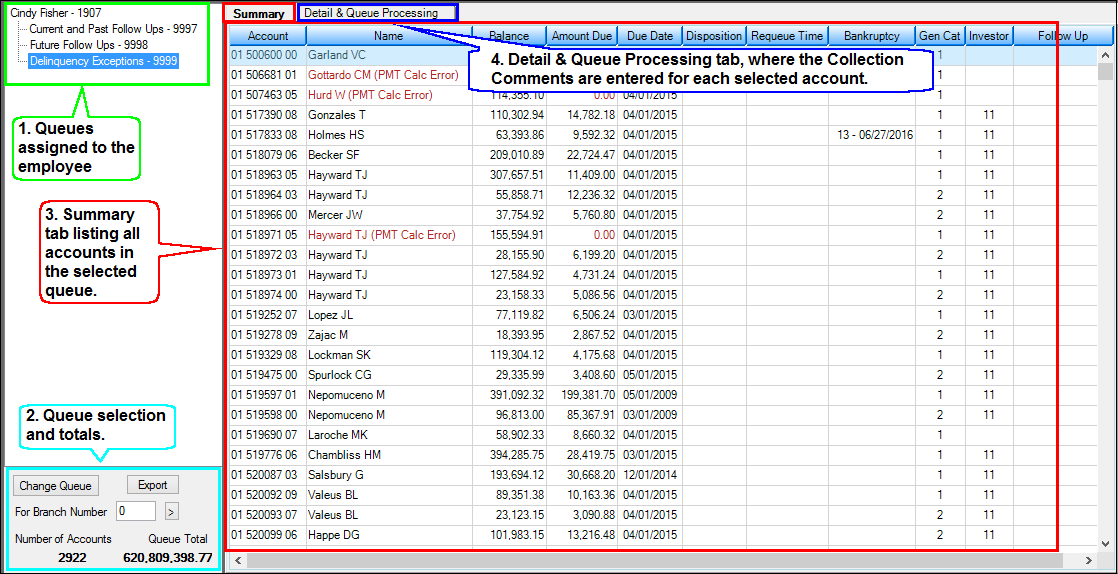
The Loans > Collections > Queues > Collection Queues screen works as an automated collection check-off list. The list may include loans that were considered delinquent only the day before, or it might include follow-up items for the collector to do on delinquent loans where contacts and commitments have previously been made. This screen is composed of four sectors, as shown below:

Loans > Collections > Collection Queues Screen
1.This sector shows all the queues assigned to the selected employee. If you have proper security, you can click ![]() in the second sector to select a different employee number to view collection queues. This is referred to as the Collection Queues list.
in the second sector to select a different employee number to view collection queues. This is referred to as the Collection Queues list.
2.The second sector allows you to change queues or branches, export queues, and view totals for each queue. See Changing Queues and Totals for more information.
3.Summary tab: The Summary tab provides the ability for the collector to see all accounts within the selected queue; queue processing allows the collector to rapidly move from one loan to the next without having to enter loan numbers.
4.Detail & Queue Processing tab: Double-clicking on a loan in the Summary list will access the Detail & Queue Processing tab (which is the Account Delinquency screen) for that account, where you can look at previous actions taken on the loan or get phone numbers, names, and other information needed for performing collection tasks. You can quickly toggle back and forth from the queue (Summary tab) to the Account Delinquency screen as collection activity progresses.
When a collector completes the collection activity for an account, if a follow-up date has been entered, the account will be removed from the queue (list view on the Summary tab) and will not appear again until the specified follow-up date or time.
When you first open the Collection Queues screen, you will be asked for your employee number. You can type in your number, or you can click <Show> to display a list of all employees who have been set up as collectors, then double-click on your name to display your assignments.
Displaying Collection Queues
The Collection Queues screen displays the collection queues assigned to each employee and allows for the review and processing of the accounts.
To display a collection queue, complete the following steps.
1.Select Loans > Collections > Queues > Collection Queues.
The first time you use Collection Queues, the Processing Number dialog will appear asking you to "Enter the employee number to process." This number will become the default, and the queues assigned to that employee will automatically be displayed.
2.Enter the number for the employee whose queue you want to display in the dialog, then click <OK>. If you don't know the employee number, click <Show> to open a list of employee numbers.
The collection queues assigned to that employee will be displayed under the employee's name.
3.Click on a queue. The accounts in that queue will be displayed under the Summary tab.
4.Double-click on an account, and that account will be displayed on the Detail & Queue Processing tab.
A queue-level option (Default Queue Processing to Comments Tab) is available that will open the account in the Comments tab rather than the Delinquent Payments tab.
5.Once the account has been processed by the collector, the queue will automatically advance to the next account when a collection comment is entered. (You can also select the option Stay on Current Account When Saving Comments, a queue-level option that will leave you on the current account instead of progressing to the next loan. When you are ready to proceed to the next loan, click the ![]() .
.
Sorting
On the Summary tab, you can sort the list view as you normally would by clicking on the heading you want to sort by. For example, click on Balance to sort by the principal balance; click on the same heading again to reverse the order (high-to-low balance or low-to-high balance). However, when you leave the screen, the sort returns to the original sort.
Note: Changing the sort does not affect the processing of the queueCit will progress through accounts based on the original sort.
Processing Number dialog
When a collector first accesses the Collection Queue screen, the Processing Number dialog will appear. Enter the employee number, then click <OK>. On the left side of the screen, all queues that employee has been assigned to will be displayed. Click on the applicable queue and the accounts that are in that queue will be displayed in the Collection Queue list view on the Summary tab.
To see all employees that are set up on the Queue Assignments screen, click the <Show> button. Double-click on an employee to go to that employee's list of queues.